Layer Masks are a powerful Photoshop tool. They can be used for compositing images or selectively applying adjustments or corrections to a specific part of an image. Masks can be used on Image Layers as well as Adjustment Layers in Photoshop.
Understanding of Layer Masks is essential. It opens up endless creative opportunities in Photoshop. These skills will also simply help you get through basic edits more efficiently and, most importantly, non-destructively.

WHAT ARE PHOTOSHOP LAYER MASKS?
They are a method of hiding or revealing part of a layer. This is achieved by painting on the mask with either white or black.
NOTE: If you’ve never seen layer masks in use, Kelly Brown uses them extensively while demonstrating her Photoshop Actions in her free Editing with Actions tutorials.
REMEMBER.. BLACK HIDES. WHITE REVEALS.
Masks can be added to any Image Layer via the Layers Window.
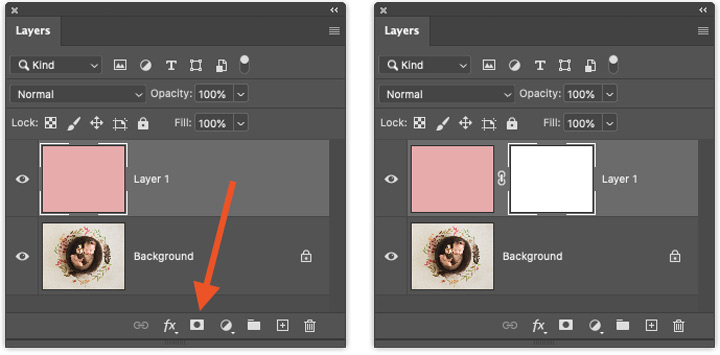
- Select the required layer. (We’re masking the pink-filled “Layer 1” in the example).
- Click the rectangular Mask icon on the bottom of the Layers window.
- The mask then appears beside the layer thumbnail, ready for you to edit.

When you initially add a mask, by default you should see it represented by a white rectangle. In this white “reveal” state, the image or adjustment layer you’ve applied the mask to, should remain fully visible.
To hide parts of the layer, set your foreground colour to black and begin painting on the mask, in the areas you wish to hide. As you paint on the mask, the corresponding areas will begin to hide. Note, factors such as your painting tool’s opacity will determine how “hidden” the image/adjustment will be.

MASKING ADJUSTMENT LAYERS
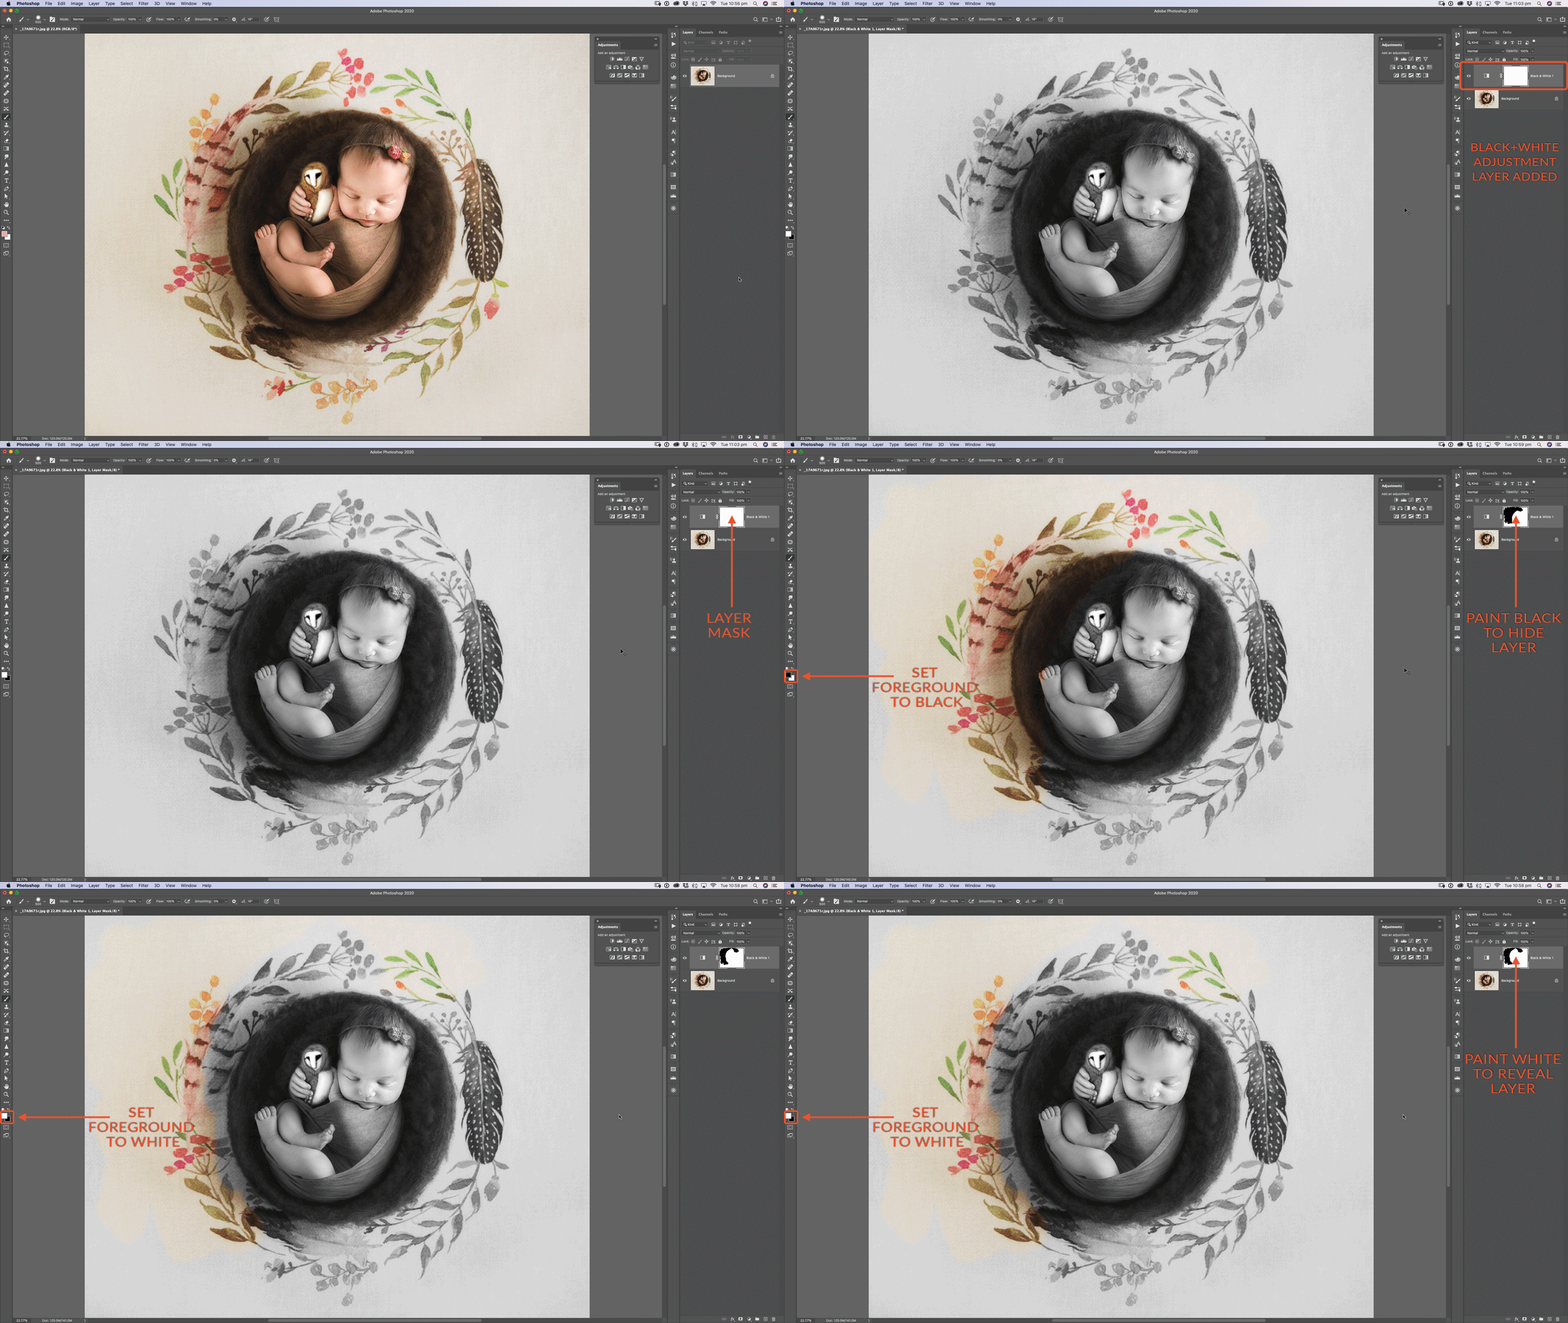
In the screenshots above, you’ve seen how to add a mask to an image-based layer. In the animation below, we’ve added an Adjustment Layer. Note, an adjustment layer has its own mask added by default when added. Edit the mask with black (hide) and white (reveal) in the same way as above, to control the areas where your adjustment appears.

- In this example, where the adjustment layer’s mask is white, the black&white effect is revealed.
- Where the mask is painted black, the effect is hidden, and we see the original colour image in the Background layer below.
- In the final slide, we switch the foreground colour back to white, and the area we repaint in white once again reveals the black&white adjustment effect.
Free Layer Masks Video Tutorial
CHECKLIST!
People often allow themselves to become overwhelmed by masks, but if you can remember the following each time you use them, we believe it will help greatly.
CHECK: FOREGROUND COLOUR + PAINTING TOOL PROPERTIES + PAINTING TOOL OPACITY
- Do you want to hide or reveal part of the layer?
- If you want to hide an area, set your foreground colour to black.
- If you want to reveal an area, set your foreground colour to white.
- Select the best painting tool for the job and size of area.
- If you’re using the brush tool, choose the appropriate size and hardness of the brush edge.
- Check your brush opacity (or painting tool of choice).
- For blending, a low opacity % will produce a semi-transparent, see-through effect on the area you have masked.
- Or, for a completely opaque or completely transparent effect, select 100% opacity on the mask area you paint.
WHICH TOOLS CAN BE USED WITH A LAYER MASK?
Almost any painting tool can be used on a Layer Mask. The most commonly used is the Brush tool, but the Gradient and Paint Bucket tools also come in handy.
Experimenting with the properties of the Brush Tool will give you total control with masks. For example, if your task is to perform a head swap by selecting and combining 2 images, then the ability to adjust the hardness of your brush edge as well as the opacity you are painting at, will allow you to achieve a seamless composite.
THE DIFFERENCE BETWEEN THE ERASER TOOL AND LAYER MASKS
In composite work, Layer Masks are a great alternative to the Eraser tool.
Using the Eraser tool on part of an image layer will literally remove those pixels. With the exception of being able to undo a few steps via History, the Eraser is essentially permanent and therefore destructive.
Using Layer Masks, you’ll be able to return to the image at any stage, as long as the layers remain intact (ie. saved as a layered PSD file), and continue to edit your masks non-destructively. This will allow you to make areas you’ve previously hidden (or “temporarily erased”) visible again.
This offers a world of flexibility. Make a rough mockup of an edit as you develop your idea, and finesse the details on the masks later once you know your direction… Refine your masks after taking some time away from your edit and coming back with a fresh set of eyes… Or correct an issue you’ve noticed after having a test print made.
Whatever the case, the non-destructive core of these layer masks allow everyone access to unlimited editing opportunities.
WHY USE PHOTOSHOP LAYER MASKS?
Layer Masks are an essential skill you really must add to your editing toolkit. Many Photoshop editing techniques, as well as actions, rely on your ability to understand and use Layer Masks, whether on image-based layers or adjustment layers. They’ll allow you to do everything from a colour change to a headswap and far beyond.
See how Kelly Brown uses Layer Masks to selectively apply her actions in her free Editing with Actions tutorials.
For more information on editing with Photoshop, see Kelly’s Photoshop Fundamentals and her Newborn Editing Workshop. Both focus on core Photoshop skills, commonly used by newborn and family photographers, including the use of masking, and will help you improve your editing skills and workflow practices.


