There are many different file management and backup processes for photographers. Each process has its own pros and cons, as each of us has different needs based on how we shoot, the products we offer, and our storage systems. In this article, we’ll give you the information to help you create your own process for organising your image files. We’ll also include some tips on archiving your data.
The journey to good BACKUP practices begins with strong FILE MANAGEMENT practices.

FILE MANAGEMENT
File Management is essentially the process you use for organising your data. The simplest way to address this as photographers, is to begin by creating a unique job folder for each new session. Then, store all relevant data within that location, in task-specific subfolders. We’ll walk through an example of this process below.
Having a central location per job will make saving and finding files for each client, quick and easy. It will also assist with maintaining your backups. How you name these files and folders also plays an important role in good file management, as we’ll discuss.
CREATE A JOB FOLDER TEMPLATE
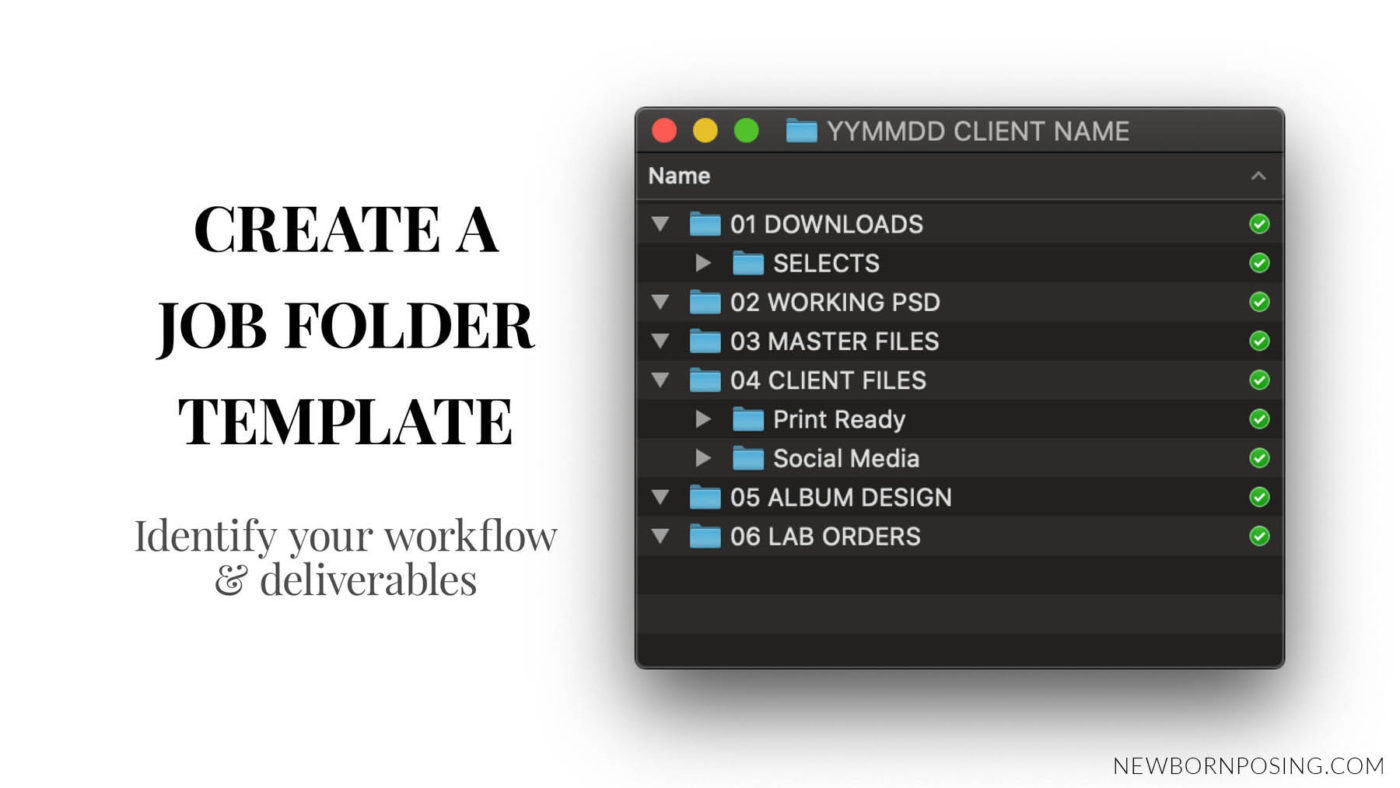
A job folder template is simply a folder filled with empty subfolders, each of which is named to reflect the tasks you undertake to complete a client order. Duplicate your template folders each time you begin a new job. Rename the parent folder (top level) with the job name.
Your template should be structured in a way which reflects your workflow and potential deliverables – that is, the type of files you need to prepare in order to produce your products.
Start by identifying your digital workflow needs. This is a process which may take some time to perfect and should be revised regularly.
The following are considerations for creating a job folder template. Our scenario suits a hypothetical portrait photographer who offers albums, print boxes, and canvases, and also includes the digital file for any ordered image. The below folder structure would suit their needs.

01 DOWNLOADS
Download your raw captures here. You may wish to add a SELECTS subfolder to separate the raw files you chose to edit for your client’s gallery.
02 WORKING PSD
Your “working files” are your editing files in progress. You should continually save the changes you make to your file every few minutes while you edit. This will help safeguard against losing your progress if your computer crashes.
We recommend a lossless file format, such as Photoshop PSD files, which supports layers. Lossless files do not lose quality each time you edit and resave. Support for Photoshop layers means you’ll be able to save your layered work to return at a later stage, should you need to make changes.
Once all products from your client’s order have been delivered, you may wish to remove the working files after a period of time – as long as you have your Master Files (point 3) saved and backed up.
03 MASTER FILES
Master Files are your finished edits, saved at the highest resolution and maximum quality. You’ll return to your master file any time you need to make a COPY of an image for a client order, album design, use in marketing material, or social media.
Where possible, Master Files should be uncompressed, flattened TIFF or PSD files (unless you have a reason for keeping any layers, as these will make your file size larger). Whilst this is achievable for photographers showing galleries of 20 to 50 images per job, for wedding and event photographers processing 500+ images per job this would demand a lot of storage. In the latter case, consider using very high quality JPGs for the bulk of your master files, whilst reserving TIFF/PSD for your hero shots from each job to allow you to produce the best quality prints.
04 CLIENT FILES
For those who sell digital files, it’s common practice to supply “Print Ready”, high-resolution, high quality JPG format, without watermarks, for the client to print. JPG file format is also a widely compatible format, and a smaller file size than TIFF/PSD. This will ensure compatibility with most devices your client will try to view these files on.
If you’d also like your client to share the images on social media, provide them a folder containing resized and watermarked images, in a separate “Social Media” subfolder.
Both sets of files are usually best supplied in sRGB colour profile, as most clients will print at a consumer lab which uses this profile.
Use your Master Files to make your client’s copies. As such, you could potentially remove the Client Files folder at a later stage if you wish.
05 ALBUM DESIGN
When designing a client album, store all working design files and proofs in their own folder. Make sure to clearly label each version of the design files if revisions are made.
06 LAB ORDERS
Create a folder for each lab, album manufacturer or in-house print order, as required.
We recommend holding on to final album print files, should you wish to produce a copy for yourself, or in case the client’s album is damaged in the future. Album or print damage is something which does unfortunately happen, and most labs only hold on to your print files for a couple of months, if that.

NAMING YOUR JOB FOLDER
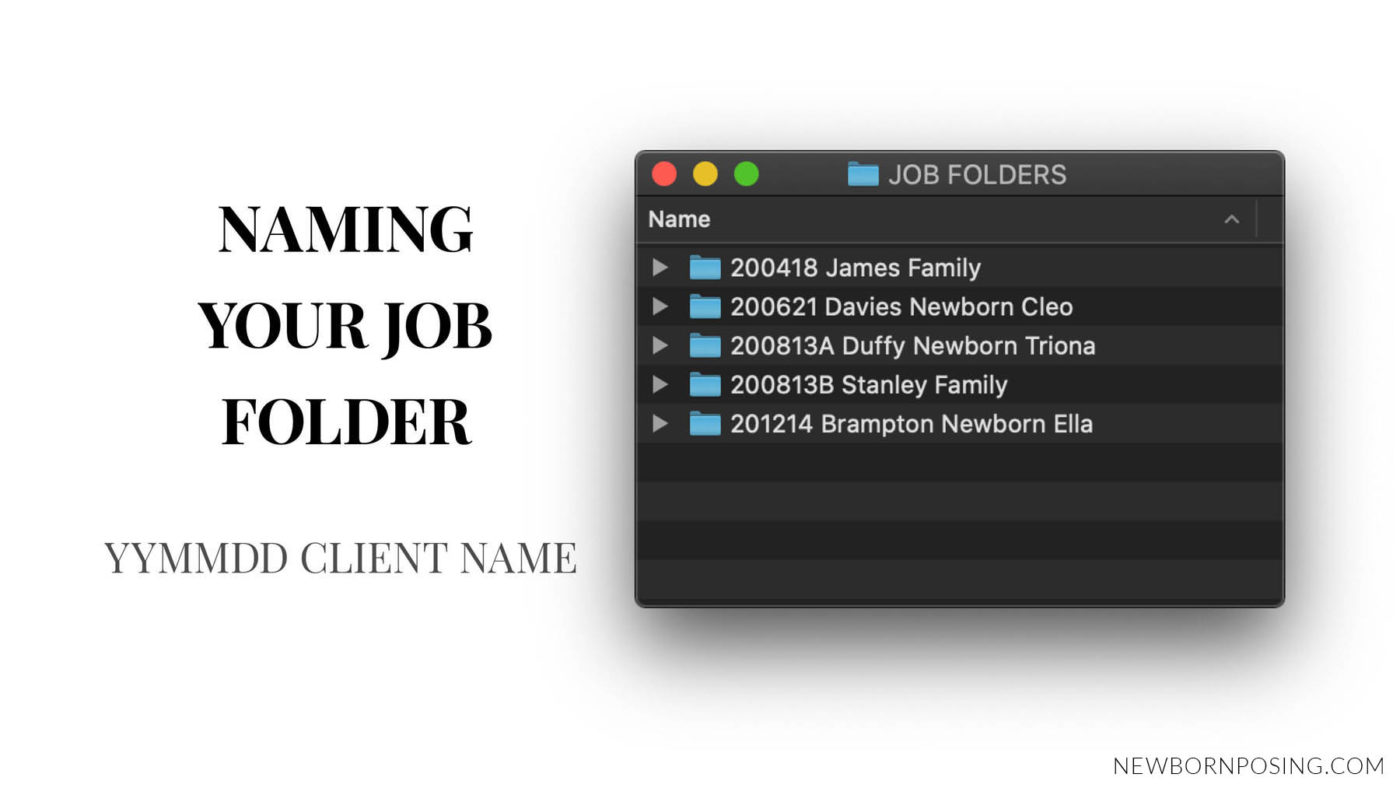
Each job folder you create throughout your career should have a unique folder name. This also means that each return client would have a new job folder for each session they attend. We recommend the YYMMDD CLIENT_NAME format.

What is YYMMDD?
The YYMMDD naming convention identifies a date. We recommend using the client’s session date in their job folder name and as their job ID.
Use (YY) the last 2 digits of the year, (MM) 2 digits for the month, and (DD) 2 digits for the date. For example, April 18, 2020 would be 200418. When browsing a folder containing job folders, the YYMMDD convention will then allow you to sort in date order. You could also use YYYYMMDD to include all 4 digits of the year if you wish.
It’s up to you to decide the format your job folder name will take. Make it unique, descriptive and not too long.
eg. YYMMDD Jones Newborn Madison; YYMMDD McQuirk Duffy Wedding, YYMMDD Company Name, etc.
What if I shoot multiple jobs on the same day?
When you have multiple jobs on the same day, simply append a unique letter to the YYMMDD identifier. For example, 200418A Tennant Newborn Molly for the first job of the day, and 200418B Davis Newborn Peter for the second, and so on. The addition of a letter will keep the folders sorting in the correct sequential order.
SHOULD I RENAME MY FILES?
This step is where processes can differ widely. And that’s okay. As we said at the start, there are many different file management processes, and you should develop one which works for you.
Some photographers choose to rename their files at the time of download to ensure every image on their system has a unique filename. This avoids the issue of seeing the same filename on different images when using multiple camera bodies, or when the filenames restart back to 0000 on your camera. This is more common practice amongst those who shoot high volume such as sports, media or wedding photographers, who might create multiple duplicate filenames per year. While it’s up to you, we believe if you’re shooting smaller volume and maintaining good file management, this step is probably not essential.
Alternatively, some photographers rename the files which they select to edit for their client galleries. (Thus, the selected raw, edited file, master file, and client file, for each renamed image, would all have this new unique filename.) If you choose to do so, ensure these files have unique names, and are sequentially numbered. Choose a naming convention such as YYMMDD_XXX where YYMMDD is the client’s job ID, and XXX is a 2 or 3 digital number, depending on the total number of files in your gallery. For example, 200418_001.JPG, 200418_002.JPG, and so on.
One advantage to renaming your client proofs, is that clients who see sequential filenames without gaps, ie. 001, 002, 003, rather than 2713, 2717, 2721, tend to be less inclined to ask to see “the rest of the images” from the session.
Another advantage to renaming your selected files is that it can simplify a search. If you have a good system which makes it easy to find the date of a client’s session, you know their job ID. eg. 200418 for April 18th, 2020. Therefore a search for files containing “200418_” should reveal all selected and edited files for that client.

FILE STORAGE AND BACKUP
When a client hires you to capture their family memories, they usually make some assumptions. One of those is that you are an established business which plans to remain so for some time. Having been in the industry for a few decades, we know that clients do return for a number of reasons. Some purchase additional images at a later stage. Some are seeking extra images of loved ones they have lost.
Over the decades, we’ve seen both scenarios, a number of times. For this reason, we believe it’s good ethical practice to hold onto your image files indefinitely. We store all raw and master files, along with any special print orders and album designs. Storage really is inexpensive in 2020 compared to what we were paying only a few years ago. We consider it an essential business expense, and a tool just as important as our cameras.
WORKING DRIVES VS BACKUP DRIVES
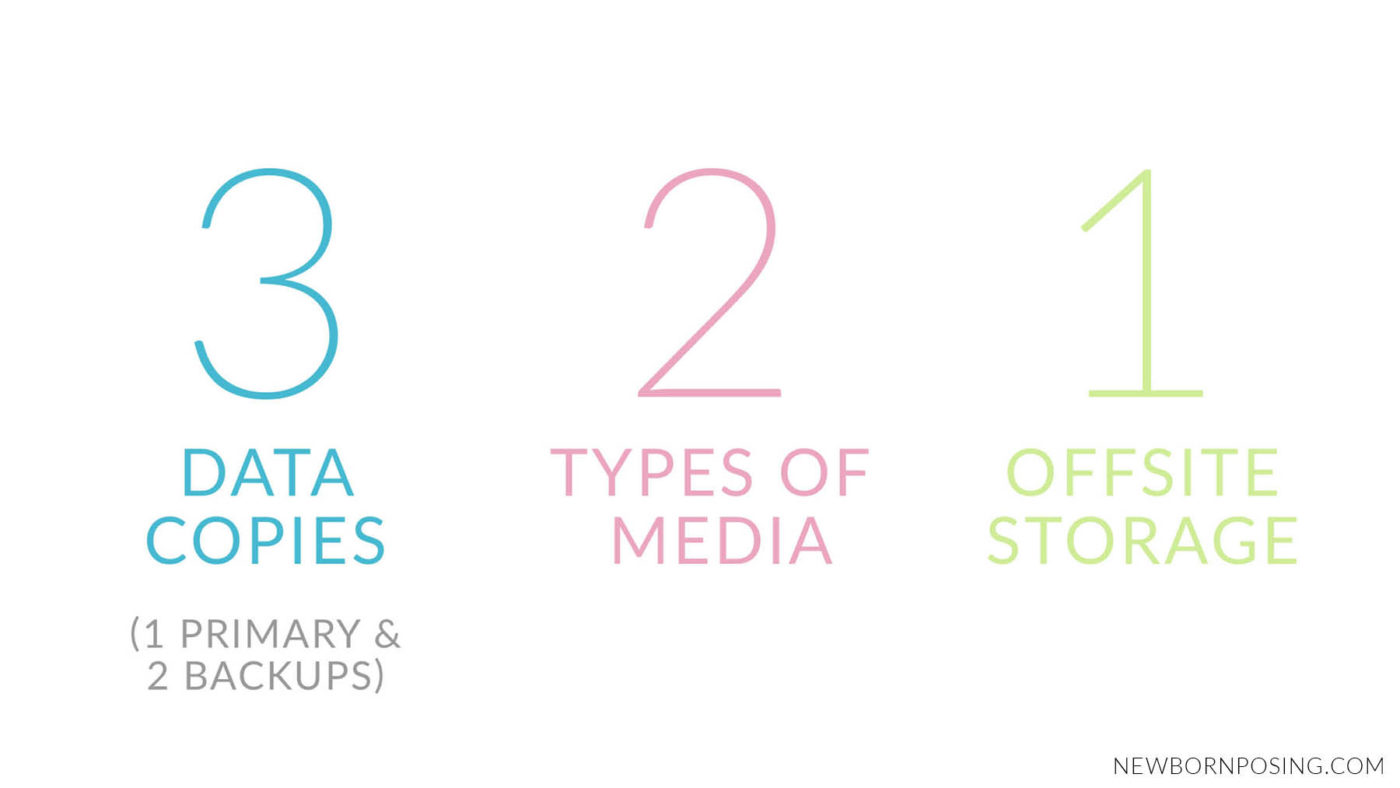
Drives fail. That’s a fact. And as scary as that can be, we find working as if that could happen at any time keeps us on our toes. We follow the 3-2-1 Backup methodology. This means that all essential data is stored in 3 places.

BACKING UP
- Immediately following a shoot, the card is downloaded to our primary storage location. This is a high volume network drive which doesn’t leave the office.
- Before the end of the day, the job is backed up to the 1st of 2 portable backup drives. Let’s call that Backup #1.
- Backup #1 is taken home.
- The next day, Backup #2 is brought into the office, while Backup #1 stays at home, offsite.
- The job is backed up to Backup #2.
- We now have 2 copies onsite in the office, and 1 copy offsite at home.
- The memory card can be moved back to the camera bag to be used again, now that we have 3 copies of the downloaded job.
- When a new job is captured, we’ll repeat this process, swapping Backup #2 and Backup #1 each time.
- As significant work is done to each job (eg. edits are finished, albums are designed, etc), these changes are also added to the client’s folder in all 3 storage locations.
- It’s essential that we have backups both on and offsite, to be prepared for all potential scenarios of failure, theft or damage.
WORKING DRIVES
Once we have made the selections to edit for our client galleries, we copy those raw files to our “Working Drive”. This is simply a separate, fast drive, connected to each computer locally. We find this more efficient and faster than drawing on our primary storage drive. It also offers the flexibility for the days we work from home, being able to take the portable drive with us. When we have finished editing a job, or done any significant amount of work, it is copied to the client’s folder in our primary storage location, and backed up to the 2 backup drives.
We have an entire article dedicated to File Storage and Backup Considerations which you can read here. For further reading, we highly recommend Peter Krogh’s The DAM Book on digital asset management.


Vicki says
Is there ever a time to delete the raw image files (downloads) to save data space on your computer ONCE YOU HAVE SELECTED IMAGES for editing? For example…you take 100 during a session but only select 25 to edit. Is it advisable to delete the 75 “rejects”?
Michelle K says
Hi Vicki. At the end of the day, your process is up to you. We choose to keep everything. If you are a wedding/events/high volume shooter capturing 1000s of frames, there are options such as converting your unselected RAWs to compressed DNGs which will create a smaller file but still give you the raw processing options. Per the article, we don’t recommend storing files on your computer, but on separate dedicated backup drives. Filling up your computer’s harddrive isn’t ideal for performance. If you do choose to delete, I would recommend waiting until well after the client has received their products, to allow time for any feedback. – Michelle