We know that Image Bit-Depth can be a confusing topic. So here are a few points to help you understand what Bit-Depth is and how it may impact your workflow as a photographer and Photoshop / Lightroom user.
You’ve no doubt seen references to 8-bit or 16-bit files when opening your images from Camera Raw, or possibly from a print-labs’ file requirements.
Put simply, the higher the Bit-Depth, the more information which can be captured or reproduced. 16-bit image files can store more colour and tonal information than 8-bit files. Bit-depth is often referred to as the number of shades which can be represented.
Setting Bit Depth in Camera Raw
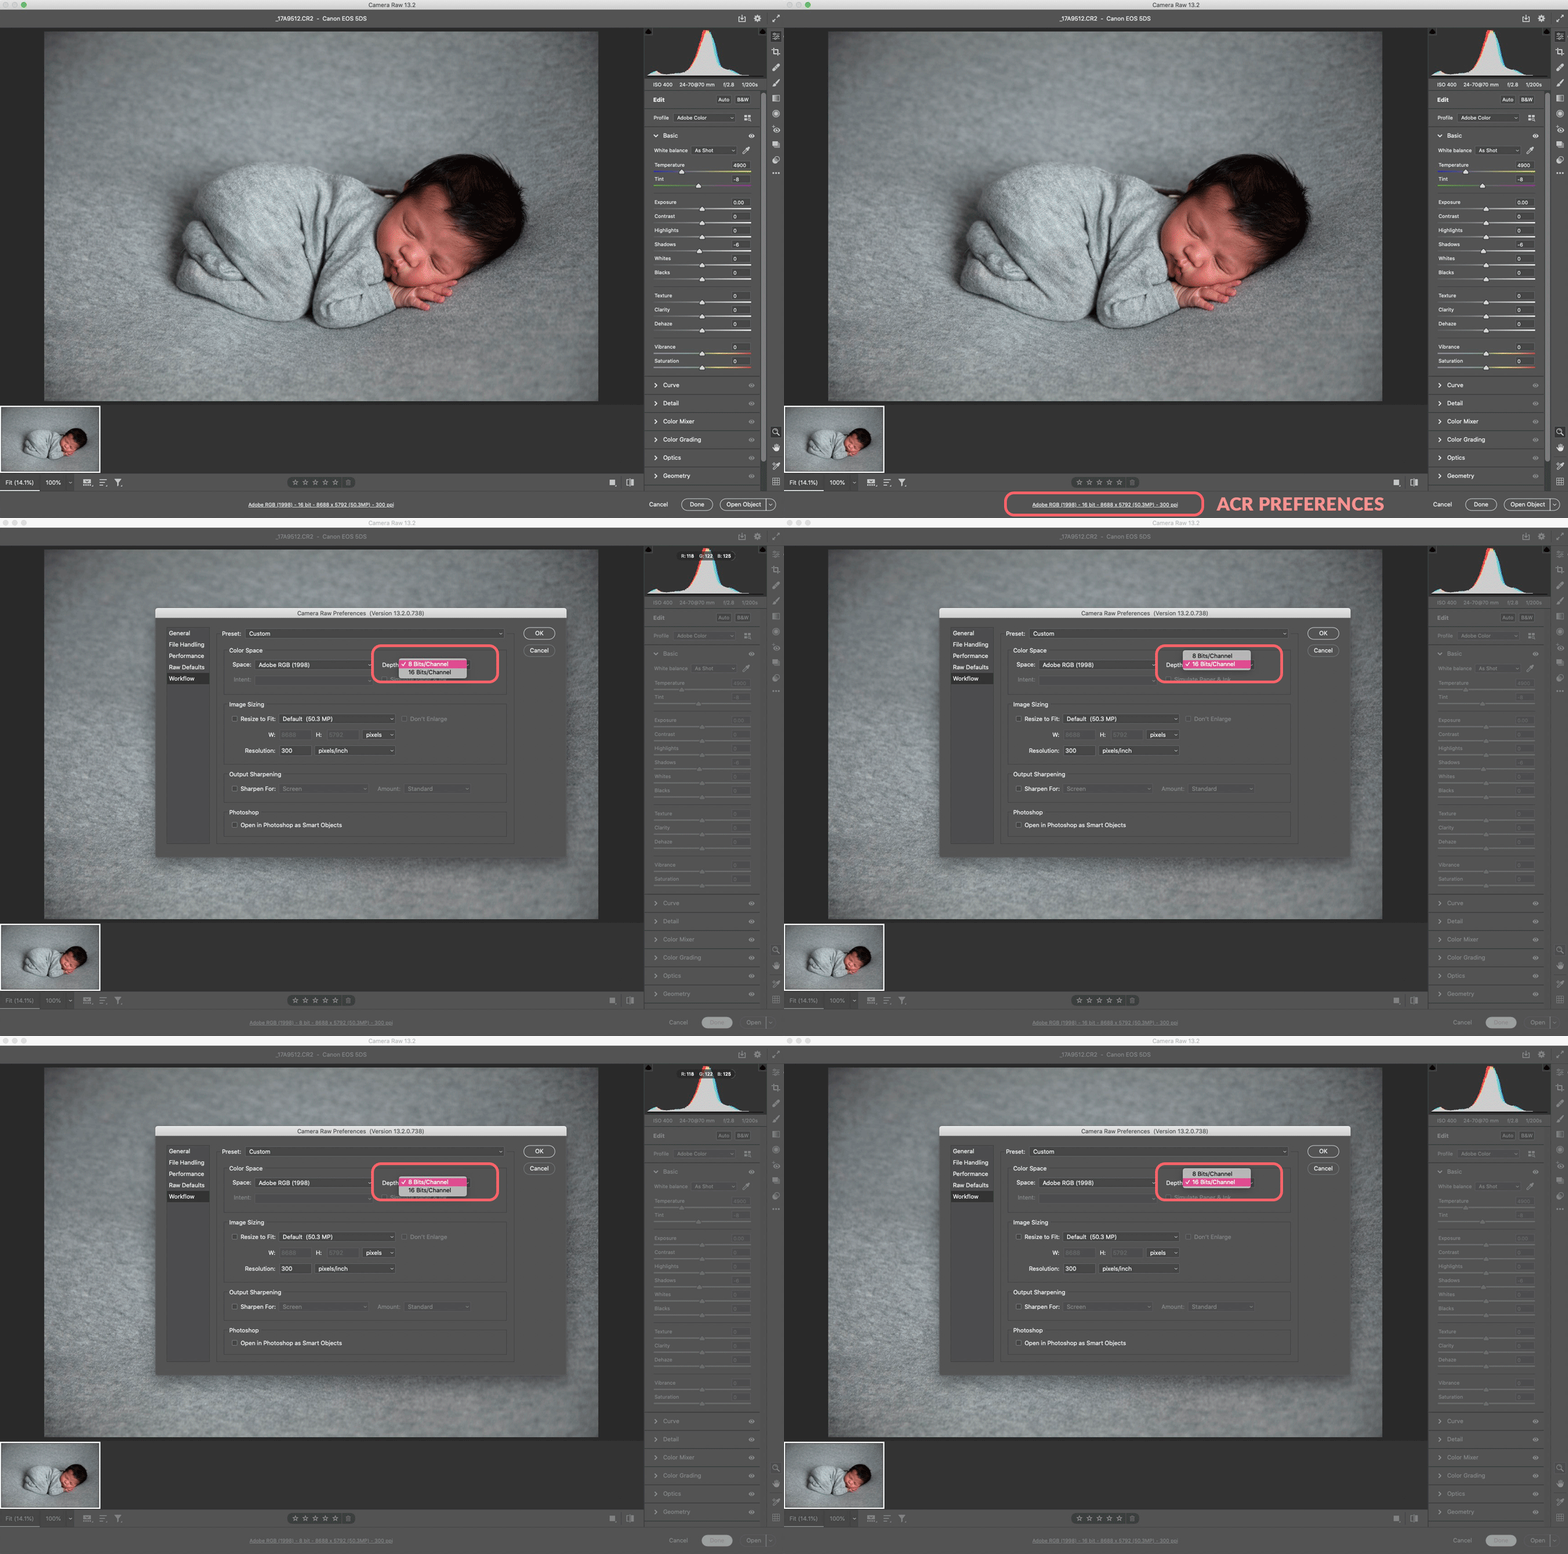
To set your image bit-depth before opening into Photoshop, click the Camera Raw Preferences, shown in the GIF below. Then choose your desired bit-depth from the drop-down.

Why choose higher Bit Depth?
Higher bit-depth will give you smoother tones or transitions between pixels in your image.
Greater bit-depth offers more detail in your whites, highlights, mid-tones, shadows, blacks. This offers better image quality, and fewer colour and banding issues.
This is one of the reasons that we recommend capturing in RAW file format. Most DSLR cameras capture 10- to 16-bit, compared with the limitations of an 8-bit JPG capture. See our article, “Shooting RAW or JPG“.

Working with 16-bit image files
16-bit gives much more information compared with 8-bit. But there are some things to keep in mind.
Image File Size
With more image information comes a larger file size. So 16-bit files require more storage and more computer processing power compared with 8-bit files. If you have an older/slower system it might struggle due to this.
Image File Formats & Bit-depth
Not all file formats support 16-bit. For example, TIFF and PSD support 16-bit, whereas JPG is limited to 8-bit.
You can learn more in our article “What you need to know about Image File Formats“.
But what about my JPG files?
Yes, you’ll likely lose some quality when saving as an 8-bit JPG for client files, social media and your website. BUT the benefit of manipulating 16-bit data while editing is the key factor in the scenario. Starting with the 16-bit file gives your image an advantage over editing an 8-bit file which has fewer tones and information.
Editing Workflow
A common workflow to preserve maximum image quality is to open an image from RAW as 16-bit and immediately save your working file as 16-bit PSD or layered TIFF. Saving your working file immediately and updating every few minutes should allow you to recover your most recent save if Photoshop crashes. A file format which supports layers, such as PSD or TIFF, is important for full control over your edits.
Working with greater image information will help you produce a higher quality image and reduce the chances of banding.
But, be mindful that when you save your client file as JPG, which is limited to 8-bit, you may lose some quality or see banding occur. So remember to inspect your JPGs after saving.
Here’s a tip!
One tip is to duplicate your working file in Photoshop (Image > Duplicate) and then flatten your layers before saving or exporting as a JPG. This often (but not always) has the result of reducing the severity of quality issues.
On the upside, having your 16-bit TIFF/PSD working file means you can find a printer to print your higher quality image for the best quality print.
Compatibility
Not all Photoshop filters can be applied to 16-bit files. This is less of an issue in 2021 than it was a decade ago. But it is still something to be aware of.

Setting Bit Depth in Lightroom
Before exporting a raw image from Lightroom Classic into Photoshop, check your file format Preferences. These determine the file format your image will save from Photoshop; the Colour Space you’ll edit in; PPI resolution; AND the Bit Depth your image will open with into Photoshop.
From Lightroom Preferences, choose the External Editing tab to set these preferences.

Your computer and 16-bit editing..
Are you concerned your computer can’t keep up with editing 16-bit in Photoshop? If so, at least keep it in mind for images where you suspect issues with banding, shadow noise, etc. Working and saving those images of concern in 16-bit will maximise their quality.
How you choose to edit is up to you and your system. But understanding why you might be experiencing quality issues will help you to manage them as needed.


Christine says
Love this definition – thanks Kelly!