Whether your relationship with Adobe Photoshop is one of love or hate, we all want to get things done faster. To help with this, Photoshop has several customisable shortcuts which you can tailor to suit your editing needs and habits. In this article, we’ll show you three types of customisable Photoshop shortcuts, which will improve your workflow.

WHAT ARE THE BENEFITS OF USING CUSTOMISABLE PHOTOSHOP SHORTCUTS?
Most Photoshop shortcuts take the form of a simple keystroke or mouse click which triggers a more elaborate event. This event could be:
- playing a multiple step action,
- executing a function which you’d typically have to search for in the menu bar, or
- choosing your tool’s settings from a series of custom presets, rather than typing the values each time.
WHAT SHOULD I CREATE CUSTOMISABLE PHOTOSHOP SHORTCUTS FOR?
There are some limitations on the number of shortcuts you can create, as they must be assigned to keys or combinations of keys. So you should choose wisely and prioritise the tasks you use most commonly.
Once you’ve assigned and become familiar with your shortcuts, they will begin to form part of your muscle memory, and you’ll find yourself using them in a fraction of the time it previously took to perform a task.
Below are some of our favourite customisable Photoshop shortcuts which help us work faster, not harder.

TIP 1 – ASSIGN SHORTCUT KEYS TO PHOTOSHOP ACTIONS
We know that Photoshop Actions help speed our workflow by allowing us to record a series of steps, which are played back in sequence, at the click of a button. But did you know that there’s a way you can access these Actions even faster?
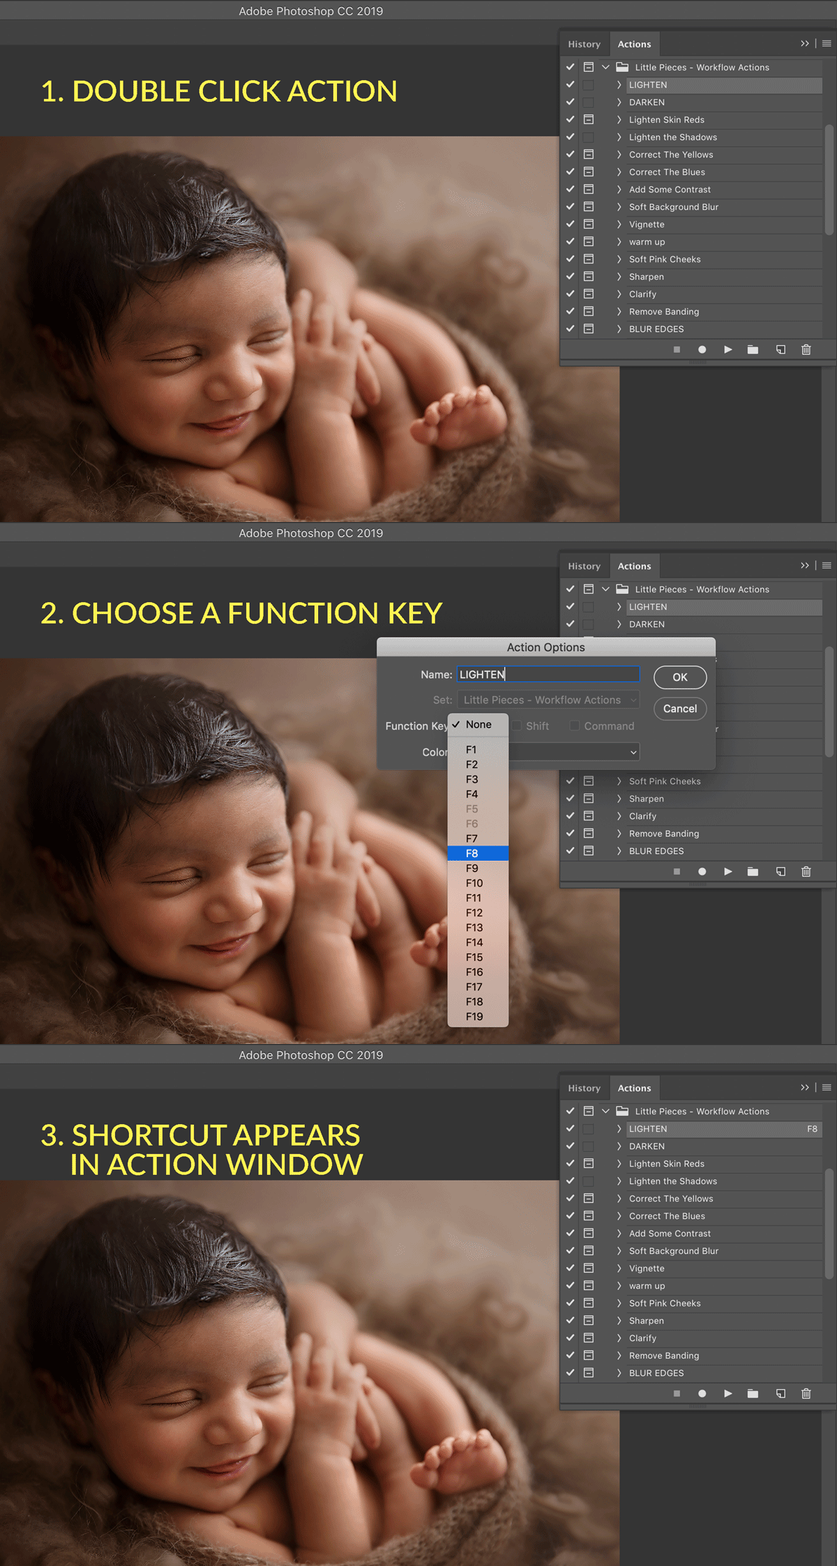
Photoshop allows you to assign FUNCTION KEYS (the F-number keys at the top of your keyboard) to your favourite Photoshop Actions. Once assigned, you’re able to run the most complex actions with the tap of an F-key, completely bypassing the Actions window.
HOW TO ASSIGN FUNCTION KEYS TO PHOTOSHOP ACTIONS
- Open your Actions Window (Window > Actions)
- Locate the Action you wish to assign a shortcut to.
- Double-click on the Action (click to the far right of the action name) to bring up the Action Options dialogue box.
- Locate the dropdown next to “Function Key”. Choose the key you wish to assign to this action.
- Note, keys already in use will be greyed out. To create more key options you can combine an F-key with Shift, Command, or Shift and Command combined.

TIP: Take a considered approach to allocating Actions to keys. We suggest working across the F-keys in a method which reflects your workflow approach.
To help yourself become familiar with the shortcuts you’ve assigned, you might add post-it notes above your keyboard as prompts. Trust us!
2 – CREATING TOOL PRESETS
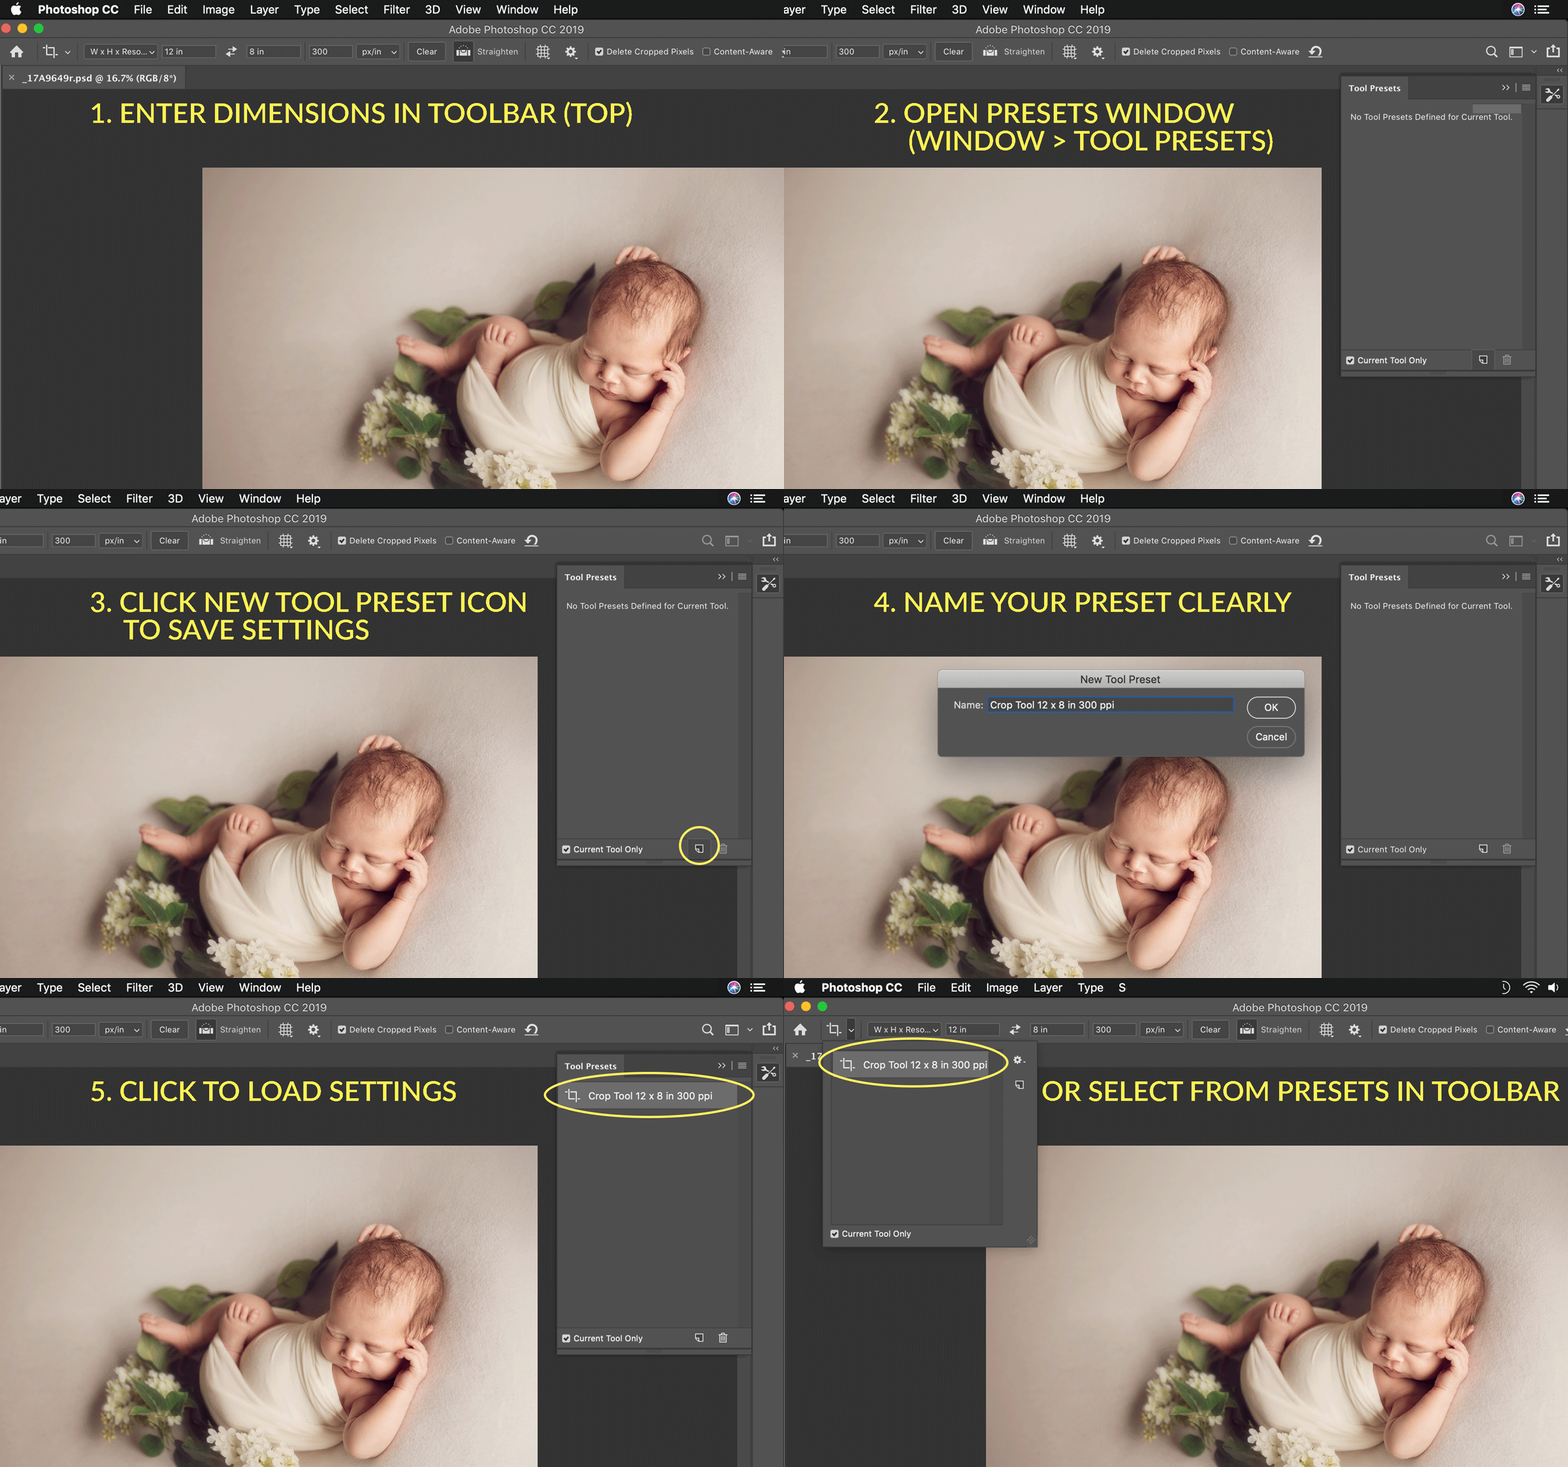
Often, as photographers and designers, we find ourselves returning to favourite styles, settings, layouts, and so on. The TOOL PRESETS window allows you to save your commonly used settings for a variety of tools. In the NewbornPosing.com studio, we often use Tool Presets for the Crop, Type and Gradient tools in particular.
Why? Create presets for the Crop Tool to define your most commonly requested print sizes. Save your brand’s fonts, colours, sizes, and more with a Type tool preset. And whether you use the Gradient tool for colour toning or just as a creative element, you can define and save those gradient presets also.
HOW TO DEFINE TOOL PRESETS IN PHOTOSHOP
- Open your Tool Presets Window (Window > Tool Presets)
- Choose the tool you wish to create a preset for. We’ll use the Crop tool in our example.
- In the contextual tool settings, *located at the top of the Photoshop interface, immediately below the menu bar, type in the settings you wish to create a preset for.
- eg. We’re choosing W x H x Resolution (width x height x res) and setting up for a 12 x 8 inch image at 300 ppi.
- In the Tool Preset window, click the New Tool Preset button (page icon) to save this preset.
- Name the preset appropriately.
- You can access this preset in future through either the Tool Preset window (Window > Tool Presets) or the Tool Preset picker which appear to the left of your contextual tool settings*. Remember that the contextual tool settings reflect the tool you have selected at the time.

Note, while you can also create presets for brushes, in recent versions of Photoshop, brushes have their own preset window. We’ll address this in a future article but for now, know if you create a brush preset, you’ll be prompted to save it in its own special place.
3 – CREATING CUSTOM KEYBOARD SHORTCUTS
Hopefully, you should be familiar with many of the default keyboard shortcuts, common across most software applications. These include Cmd/Ctrl + S for Save, Cmd/Ctrl + C for Copy, Cmd/Ctrl + V for Paste. These are just a couple of the many keyboard shortcuts accessible in Photoshop, but did you know you can modify or create your own custom keyboard shortcuts for your most used functions?
If you find yourself repeatedly going through the menus or palettes to perform a task, (adding a new Curves adjustment for example), you can assign a keyboard shortcut to this task instead.
Yes, you could also create an Action for this shortcut, but unless you want to add additional steps to the task, it’s generally simpler to create a Keyboard Shortcut. Additionally, there’s no sense taking up an F-key shortcut when you have other options.
HOW TO CREATE CUSTOM KEYBOARD SHORTCUTS IN PHOTOSHOP
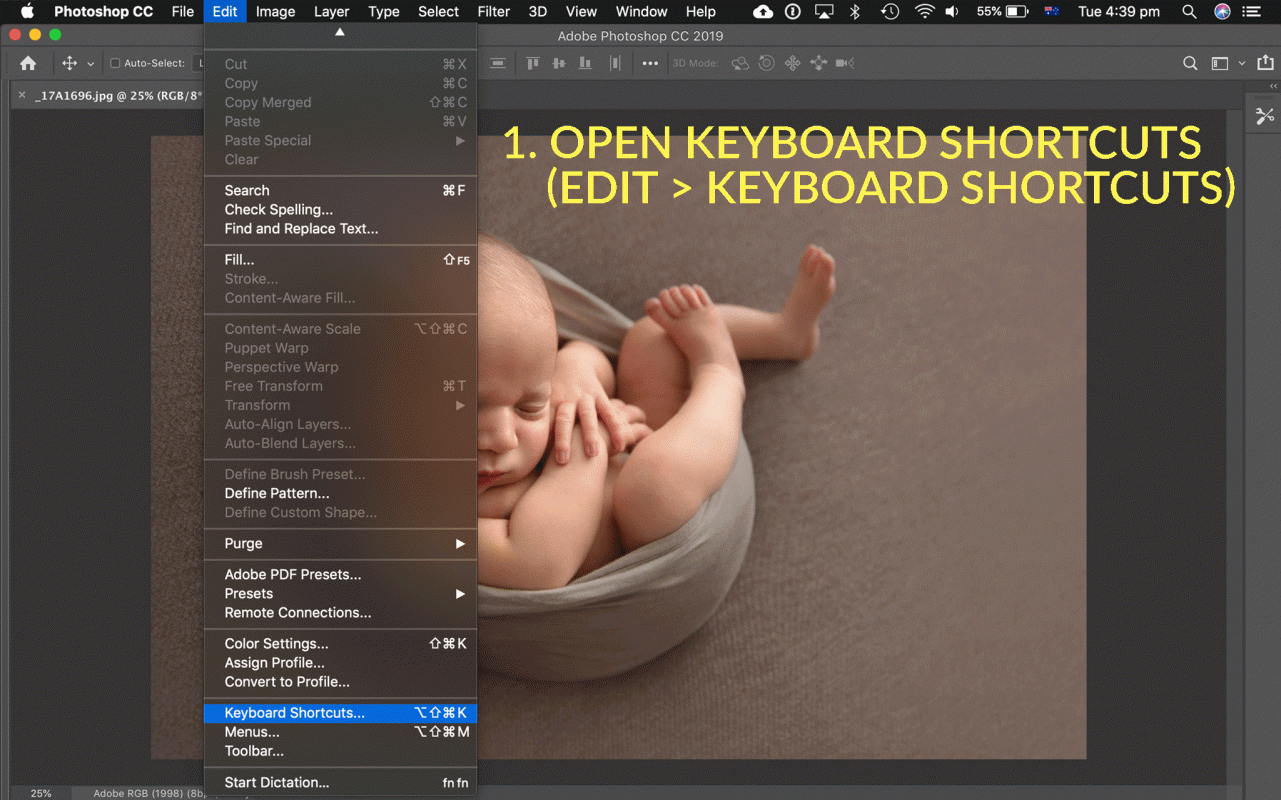
In this example, we’ll demonstrate assigning a keyboard shortcut to add a curves adjustment layer to our document. Without a shortcut, we’d access this via Layer > Adjustment Layers > Curves through the Application Menu (the menu at the top of the Photoshop interface); or through the Adjustments palette. Creating a keyboard shortcut will allow us to bypass both the menu and the Adjustments palette.
- Open Keyboard Shortcuts (Edit > Keyboard Shortcuts)
- You’ll find options including Application Menus, Panel Menus and more. We’re working with Application Menus in this example.
- We’re looking to follow the Layer > Adjustment Layers > Curves path, so click on Layer. Then scroll through the (long) list of options until you find New Adjustment Layer, and then choose Curves.
- The shortcut field to the right of Curves will become active. Use a combination of special keys (Command / Control / Alt/Option / Shift) plus a character to set the shortcut.
- If the chosen shortcut is already in use, you will see a warning and be asked to confirm or change.

- Download our FREE Photoshop Shortcuts printable guide now
WHAT NEXT?
So, the next time you sit down for an editing session, write a list of the tasks you find yourself performing repeatedly. Come back to this article and spend some time setting shortcuts for those which support them. Create a document (or a bunch of post-it notes!) summarising the new shortcuts you’ve created, and start putting them to use. After a while, they’ll become second nature, and you’ll wonder how you survived without them!


Heather Elliott says
great article – very informative, now to put it into action
Patricia says
OMG! This is wonderful thank you for taking the time to do this very helpful article! Kelly and the whole team are the best! good job!!!