In this post, we’ll show you HOW to add a watermark to your images in Photoshop using two different methods. While there are many arguments for whether or not you should watermark your images, we’ll leave that decision up to the photographer, based on how and where the image will be used.
WHAT IS A WATERMARK?
A photographic watermark is a graphical mark, overlaid on an image. They usually take the form of a business logo, the artist’s name, or website URL, but may include additional text such as “copyright” or “proof only” as required.
WHY USE A WATERMARK?
A watermark helps identify you as the creator of an image. This is certainly helpful if someone has shared your image without authorisation.
Watermarks can also be beneficial on social media files supplied to clients. This identifies you when clients share the images you’ve created for them with their friends, creating a passive referral system.
Watermarks are often used in online galleries to discourage image theft. Of course, this only provides a deterrent, rather than a complete anti-theft solution.

BEST WAY TO WATERMARK IMAGES IN PHOTOSHOP?
We’ll look at two methods to add your watermark in Photoshop. In the first, we’ll create a brush preset in the shape of your logo, which you can simply “paint” on to your image in a single click.
Secondly, we’ll demonstrate how to place your logo file on to your photographic image, in Photoshop.
WATERMARK METHOD 1:
CREATE A PHOTOSHOP LOGO BRUSH PRESET
In our example, we want to prepare a logo brush in Photoshop to suit our web-sized images. We resized our web images to 2048px on the long side (the maximum size Facebook will allow in 2019). We don’t want our logo watermark to take up more than half the image width, so 800px to 1200px wide should be adequate for most web logo brushes.
- Open your logo file into Photoshop.
- Check that your logo image dimensions are suitable. You’ll want to avoid having to enlarge your brush, as quality will begin to degrade.
- For best results, your logo should consist of strong black and white areas. The black pixels will form the brush shape.

- Choose SELECT > ALL from the menu to select the full logo area.

- From the EDIT menu, select DEFINE BRUSH PRESET.
- Give your brush a descriptive name when prompted.

- Your Photoshop logo brush will appear in your Brushes window. (WINDOW > BRUSHES)
- TIP: To keep your brushes organised, create a NEW Brush Group by clicking on the group (folder-shaped) icon at the base of the Brushes window. Give your group a name and drag your brush into the group.

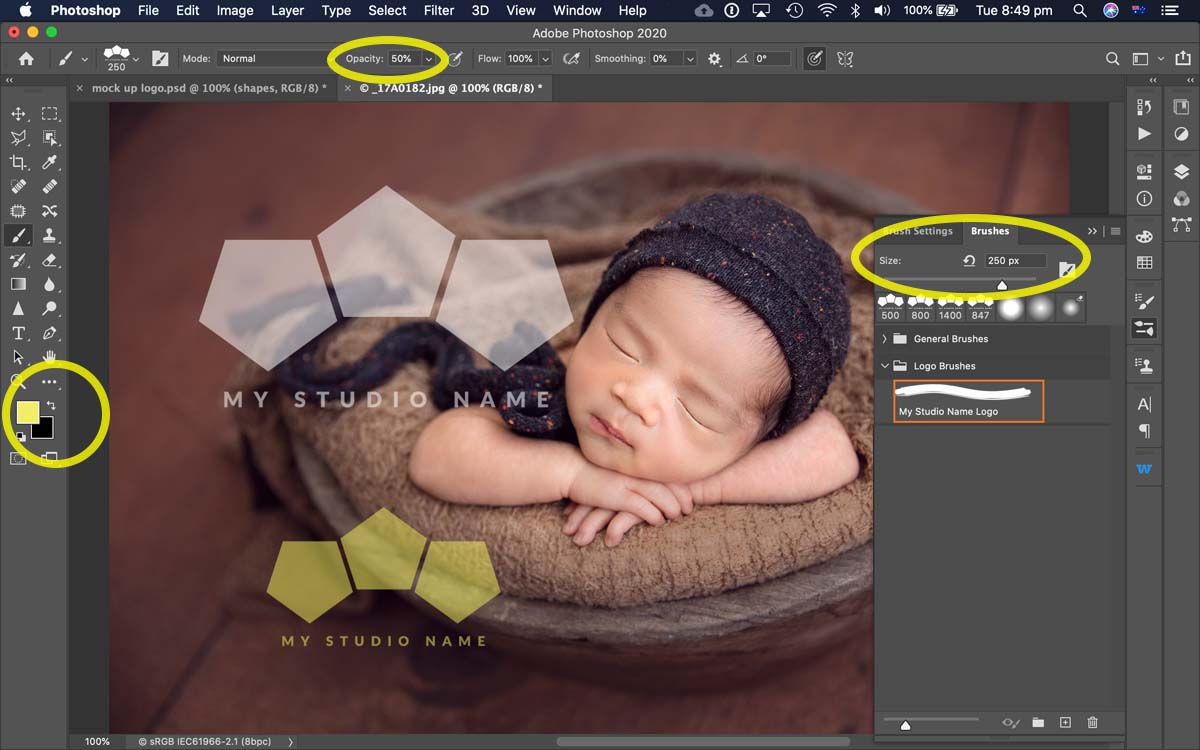
- With the logo brush selected, simply click to apply to your image.
- You may adjust foreground colour, opacity and brush size to control the appearance of your logo brush.

For best results, it’s advisable to resize your image for web dimensions prior to adding your logo.
TIP: We recommend making web-sized copies of your images before adding your logo. This should help you avoid accidentally watermarking your high-res Master File.
WATERMARK METHOD 2:
PLACE LOGO FILE
An alternate method to watermarking with a logo brush is to place your logo file directly onto your image. There are a few different ways to achieve this including dragging and dropping your logo file into your image window in Photoshop; or using the File > Place method, which we’ll cover below.
WHICH FILE FORMAT IS BEST FOR WATERMARKING IMAGES?
Having your logo on a transparent background is preferable so that it doesn’t distract from the underlying photo. File types which support transparency include .EPS, .PDF and, perhaps most common today, .PNG.
However, if you only have a flattened .JPG image, you can use Photoshop’s blending modes to isolate the logo from its background.
PLACING A TRANSPARENT LOGO FILE:
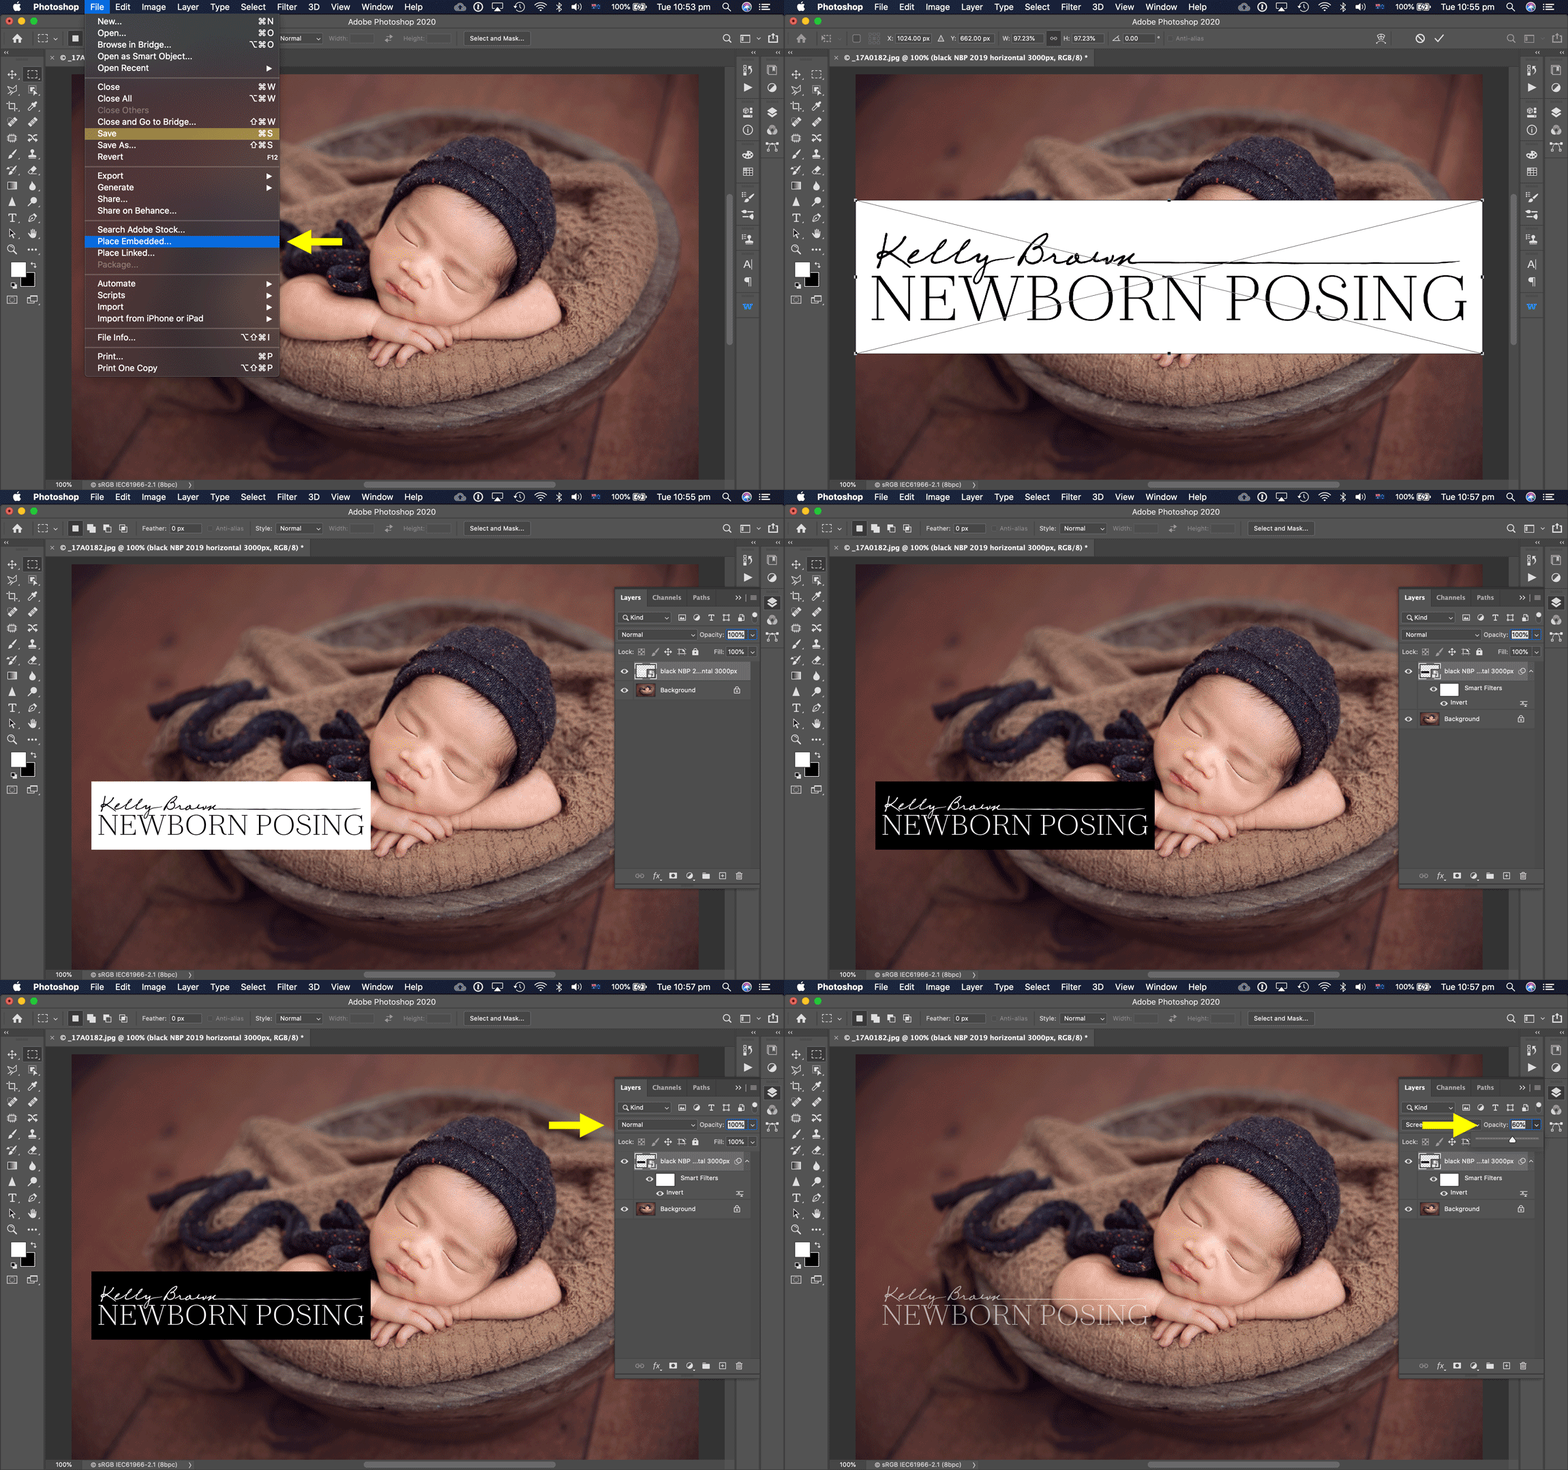
- From the FILE menu, choose PLACE EMBEDDED.
- Locate your logo file and click the PLACE button.
- Drag from a corner of the placed logo to resize.
- Press the RETURN/ENTER key on your keyboard, or click the TICK symbol in the upper toolbar to accept the resize. *You must finish this step before Photoshop will allow you to move on after you have placed an object.
- If you have placed a transparent logo file, simply reposition with the Move tool and adjust the layer opacity if desired.
- When finished, simply Save for Web.
PLACING A FLATTENED JPG LOGO FILE:
If your logo is a flattened JPG image, you’ll need a few extra steps to hide the background when watermarking your image. In the animation below, we use a black logo on white background, on a dark photo, so will demonstrate inverting the logo to become a white graphic.
- Follow steps 1 to 4 as above.
- Still on the logo layer, from the IMAGE menu, choose ADJUSTMENTS, then INVERT. Your logo will become white on a black background.
- In your Layers panel, change the Blending Mode of the logo layer from Normal to Lighten or Screen. This will cause the black areas of the logo to become invisible, leaving just the white logo.
- Reposition using the Move tool, and adjust the logo layer opacity if required.
- NOTE: If placing a logo on a light photograph, use your black logo on white background; skip the invert step, and choose Darken or Multiply as your Blending Mode.

If you need help resizing or saving your images for web, see our article on Optimising Images for Web and Social Media. The article includes a link to a FREE Photoshop Action for you.
REMINDER: Be sure to only watermark copies and not original master files.
A NOTE ON WATERMARKS & COMPETITIONS
Remember, in the majority of cases, entries into photographic competitions must be anonymous and without any identifying marks. Be sure to keep your Master File and any award entry files, unless otherwise specified, clear of watermarks.
ADDING WATERMARKS TO IMAGES
In this article, we’ve covered two methods of adding watermarks to your images using Photoshop. Other methods of watermarking your images are certainly available including online apps, Photoshop extensions and Lightroom exports. We find the above methods simple and quick, and of course, having a well organised Media Library helps access logo files quickly.
Do you have any questions about watermarking images? Let us know in the comments below.

