Workflow tips and tricks for using brushes in Photoshop
You’ve probably noticed that a large percentage of the tasks you carry out in Photoshop are applied with Brushes. The following brush shortcut tips will help you work faster with these tools. These shortcuts apply to the original paint Brush tool, as well the Clone Stamp, Healing Brush, History Brush, Eraser and more. These tools often require constant adjustments to the size, edge softness, and opacity properties. So it’s important to be able to change these quickly and efficiently.
Did you know Photoshop offers multiple methods for changing these properties? We’ll show you 3 ways to modify brush settings, to speed up your workflow.
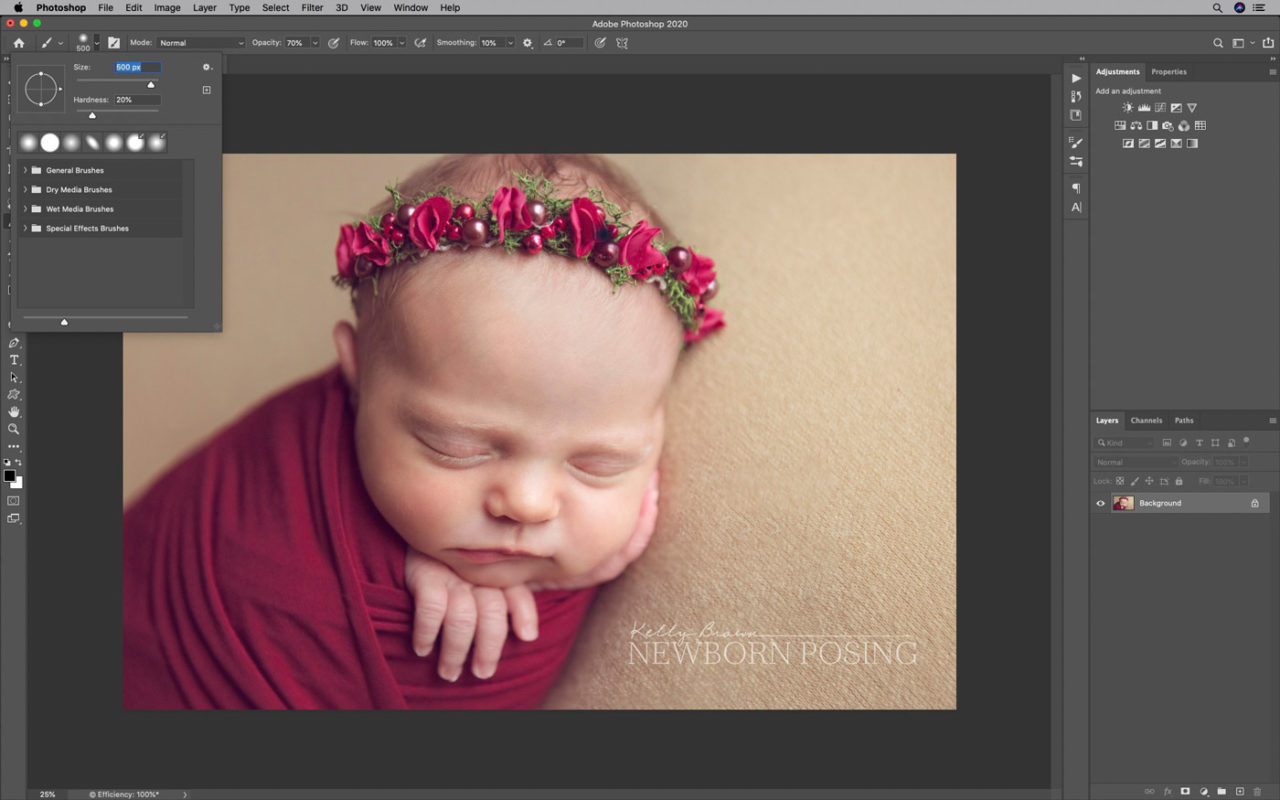
Before we start, make sure you are familiar with your Tools Panel keyboard shortcuts! For example, simply press the letter B on your keyboard to make the Brush tool active. You’ll find more about the Tools Panel options and shortcuts over at Adobe’s website.
Photoshop Options Bar to Change Tool Properties
The Options Bar (also known as the Control Panel) sits directly below your Photoshop menu bar. You can show/hide the panel via Window > Options in the menu.
The Options Bar changes to reflect the properties available to the active tool – that is, the tool most recently selected from the Tool bar.
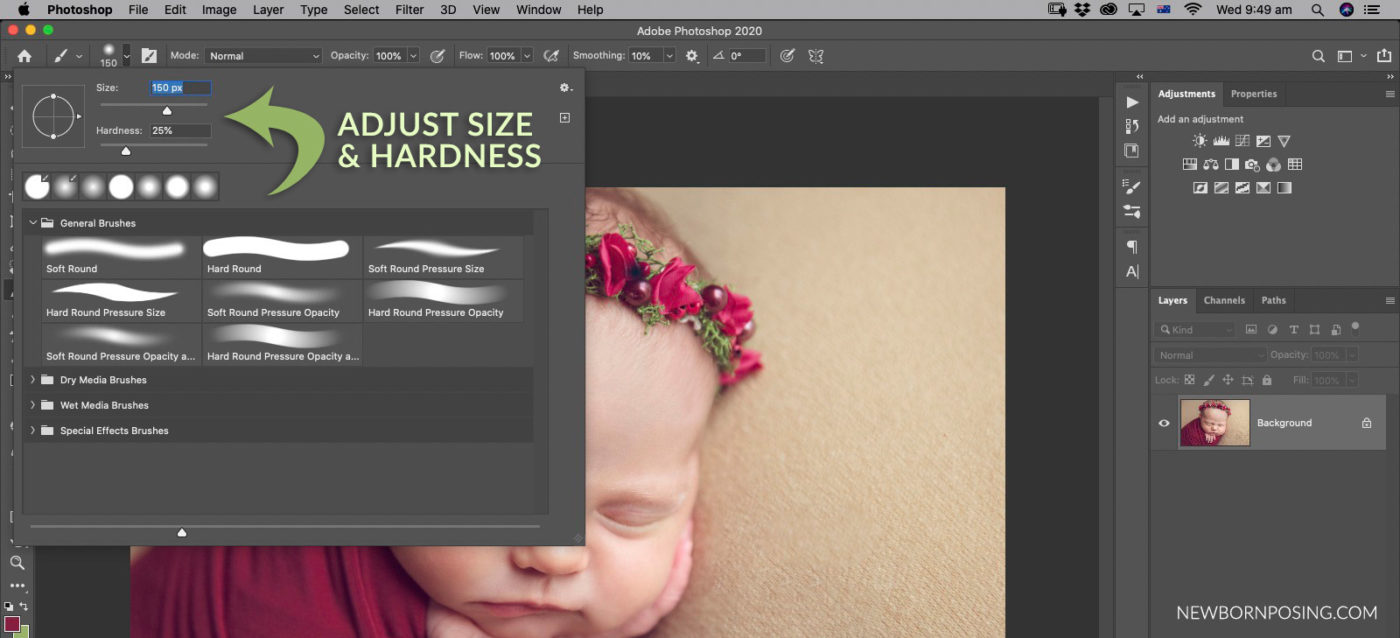
The GIF below shows the Options Bar settings for the paint brush tool. Note, you’ll find an additional dropdown menu (3) when working with any brush tool. This additional menu allows you to modify brush size, edge hardness, rotation, brush thickness, as well as access to any custom brushes you have loaded into Photoshop.
Note, for the majority of editing, the General Brushes will suffice.
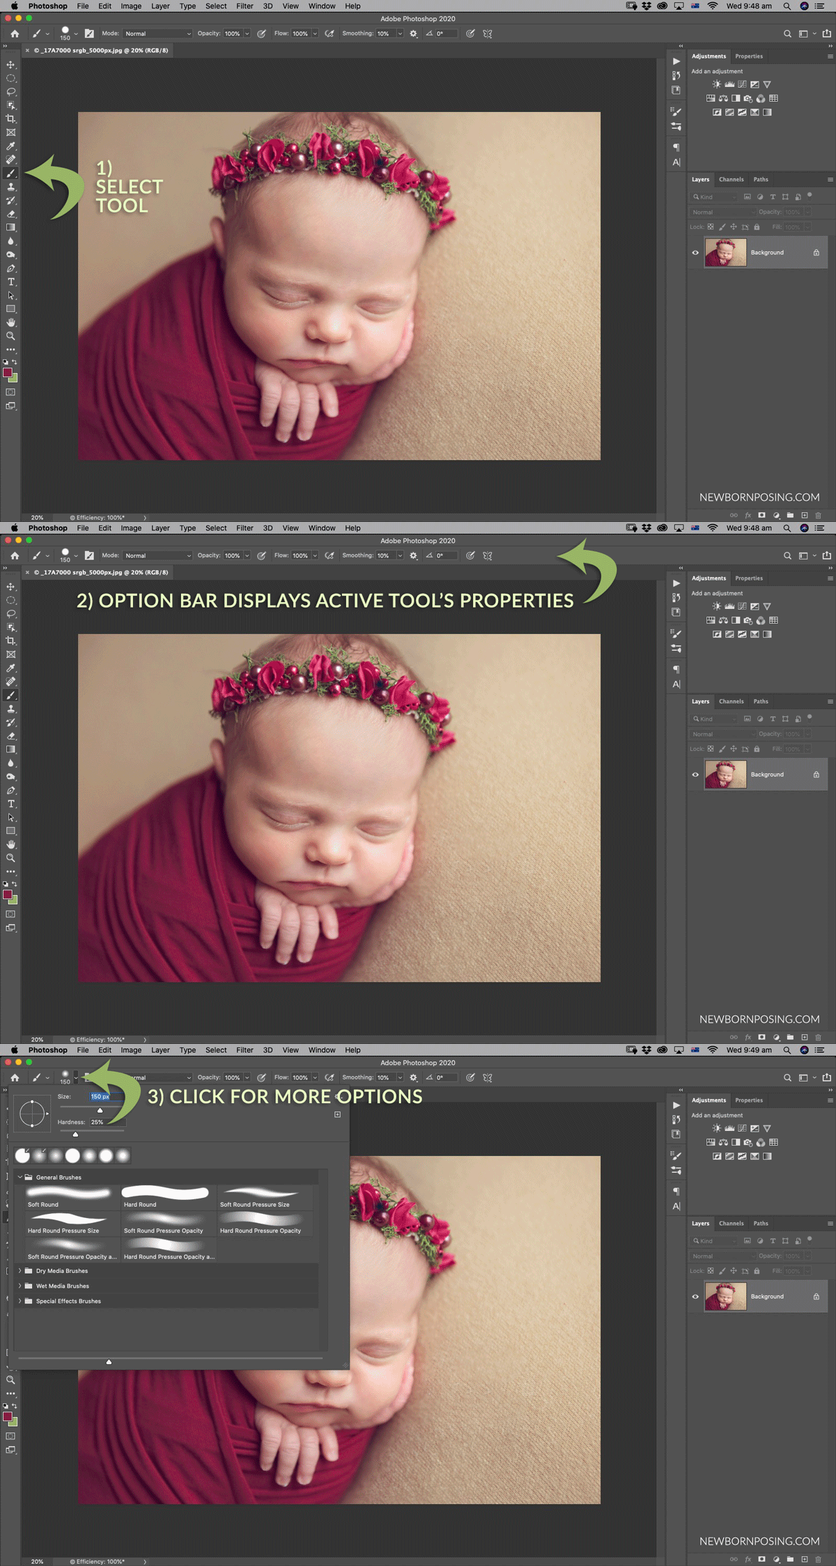
You may adjust a multitude of brush properties using this method.
BENEFIT: While not the fastest method to change size and hardness, this option provides you with more brush properties and alternatives than the shortcuts we will cover next.
SHORTCUT TIP: You can also access the brushes panel quickly while a brush tool is active. The panel will appear at your cursor, like in the screenshot below, without you needing to access the top Options bar.
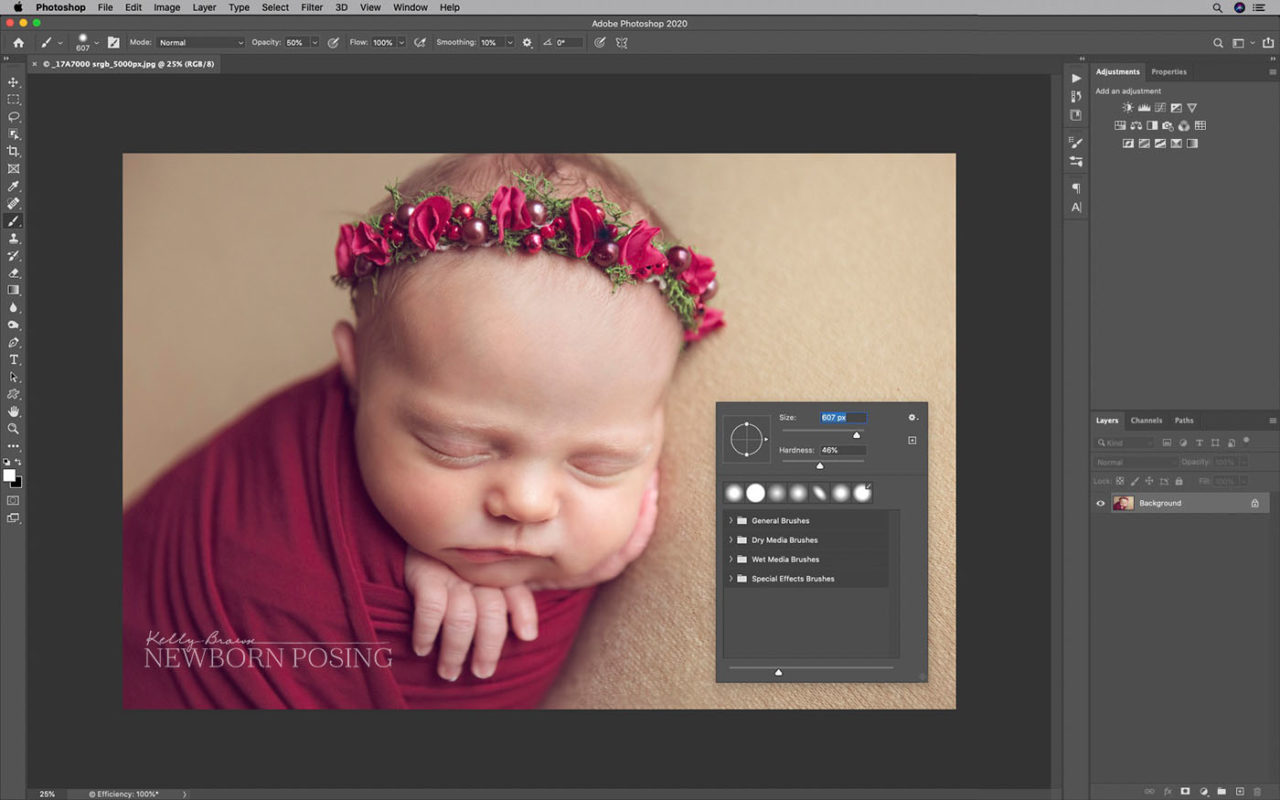
MAC USERS: Hold the Control key and clicking anywhere on your image.
WINDOWS USERS: Right-click anywhere on your image.
Photoshop Brush Keyboard Shortcuts
The SQUARE BRACKET keys are every Photoshop user’s best friends. They are one of the easiest ways to change brush size and edge hardness in an instant!

Tap the left square bracket key to make your brush size smaller, or the right square bracket key to make your brush larger.

To change the hardness of your brush edge, hold down the Shift key and tap your square bracket keys. Shift + the left square bracket makes your brush edge softer. Shift + the right square bracket makes your brush edge harder.

OPACITY, FLOW & SMOOTHING SHORTCUTS
When using a brush-based tool, your Options panel displays Opacity and Flow values. Use the NUMBERS on your keyboard to quickly change these values.
Tap a SINGLE DIGIT on your keyboard to change your tool’s Opacity to that value times ten. For example, pressing “7” will set your opacity to 70%.
Tap 2 DIGITS IN QUICK SUCCESSION to change your tool’s Opacity to that value. For example, pressing “7” then “5” quickly, will set your opacity to 75%. For a value lower than 10, type zero as your first digit, such as “0” then “5” for 5%.

To adjust the Flow, press and hold Shift, and then the number key/s, as above.
In the latest versions of Photoshop, you will also find a Smoothing value, used to control line smoothness. To adjust, press and hold Alt/Option, and the number key/s, as above. TIP: Unless you want Photoshop to control and smooth your lines, set the Smoothing value to / close to 0.
Brush Shortcuts via Heads Up Display (HUD)
Photoshop’s “Heads Up Display” or HUD, is one of the lesser known methods of accessing brush shortcuts. It takes a little getting used to, but like everything, can become your goto shortcut method with a little practice.
The HUD displays a range of values relating to your brush tool. Once you’ve activated the HUD, you will see a red circle, previewing your brush size and hardness. Note, this red is simply an indicator, not your painting colour.
By dragging the mouse (or stylus) up/down or left/right, you can change the size and hardness properties of your brush.
- Activate the Brush HUD
- WINDOWS USERS: Press and hold the Alt key, then right-click inside your image area.
- MAC USERS: Press and hold the Control and Option keys, then click inside your image area.
- You can release the keyboard keys, but keep your mouse button held down. The red preview should appear, showing the current size and hardness of your brush.
- Change the Brush Size – Drag the mouse left (smaller) or right (larger)
- Change the Brush Hardness – Drag the mouse up (softer) or down (harder)
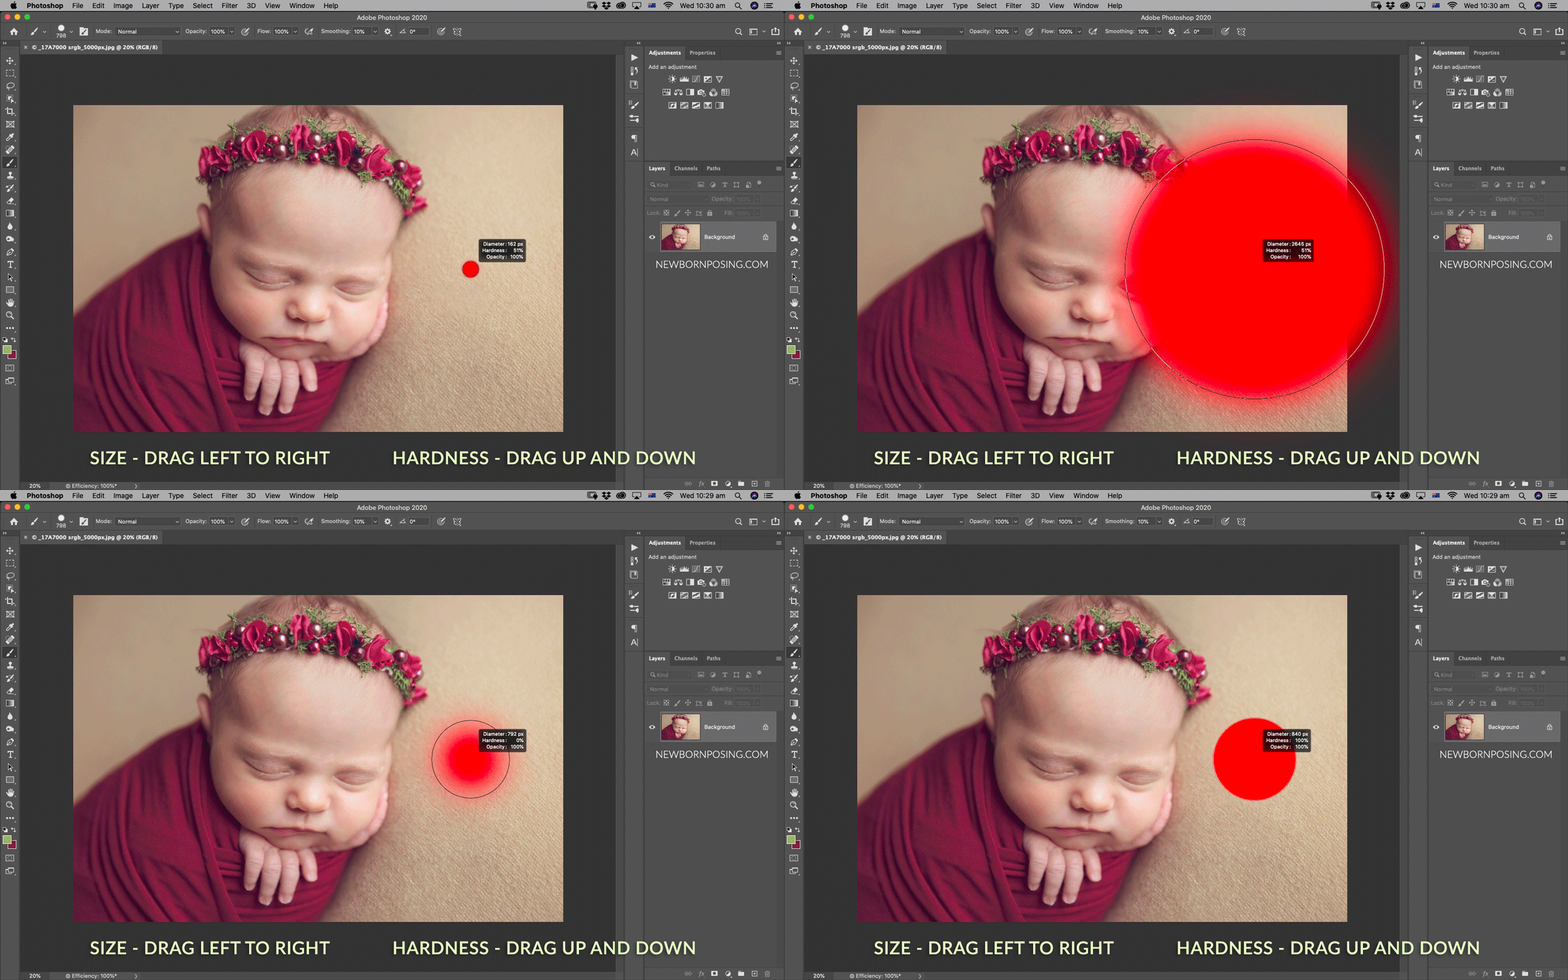
While the HUD shortcuts might take some more getting used to, the advantage they offer over the square bracket keys is very precise changes to the size and hardness values. Notice the square brackets change these values in larger increments, whereas the HUD allows smaller, single pixel / percentage changes.
Conclusion
Experiment with each of these Photoshop Brush shortcut methods. You can see that each has different benefits ranging from speed to precision of values. Spend some time becoming familiar with the 3 options so that you can select the one which is best suited to your requirements to speed up your Photoshop workflow.
Find more Photoshop tips by filtering our blog by the “Photoshop” category.


Sara says
Thank you for this – super clear article and so pleased to have learnt about the HUD! Thanks for sharing the knowledge! x
Gretchen Willis says
wow, great tips! This will save me a bunch of time. Thank you!