In these Photoshop tips for beginners, we’re focusing on the Photoshop Workspace. The workspace is the broad term used to refer to all of the elements which appear on your Photoshop screen or interface. If you’re relatively new to Photoshop, you may find that even before you start editing, the number of windows and menus alone can be overwhelming. The important thing to know is that you don’t need to understand or use every tool, menu item or panel when you’re starting out. In fact, there are some tools you may never need to use, so don’t allow them to defeat you before you even start. As you develop your skills and your own style, you’ll be able to create your own workspace layouts to prioritise your favourite and most used tools.
In this article, we’ll walk you through the elements of the Photoshop workspace, point out the essentials, and offer a few time saving tips.
We’d encourage you to make notes while reading or return to work through this article while you have Photoshop open, and try the tips we suggest throughout.
PHOTOSHOP HOME SCREEN
When you first open Photoshop, you may see the Home screen (depending on your version and settings). This view can be configured to display a range of different elements, from Adobe Tips to your most recently accessed images. Note you can view your recent images in list or thumbnail view, and change their sort method.
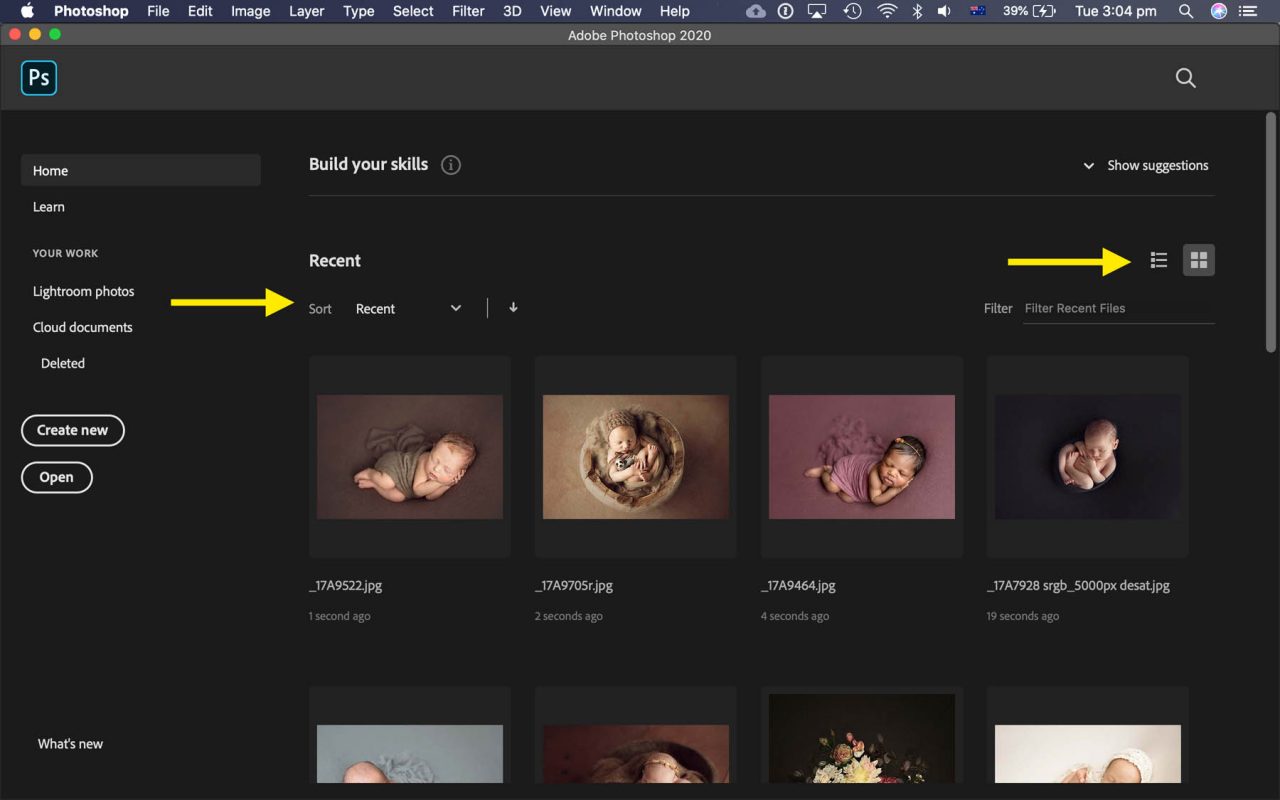
To close the Home screen, you can Open / Create a new image, or press the Escape key. To return to Home view at any time, choose Help > Home from the top menu bar.
EXPLORING THE PHOTOSHOP WORKSPACE…
PHOTOSHOP MENU BAR
The menu bar is located at the very top of the Photoshop workspace.

Browse the menus to make yourself familiar with the options in each. As you become a more frequent user of Photoshop, start to note the shortcuts to your most commonly repeated tasks, displayed to the right of a menu item.
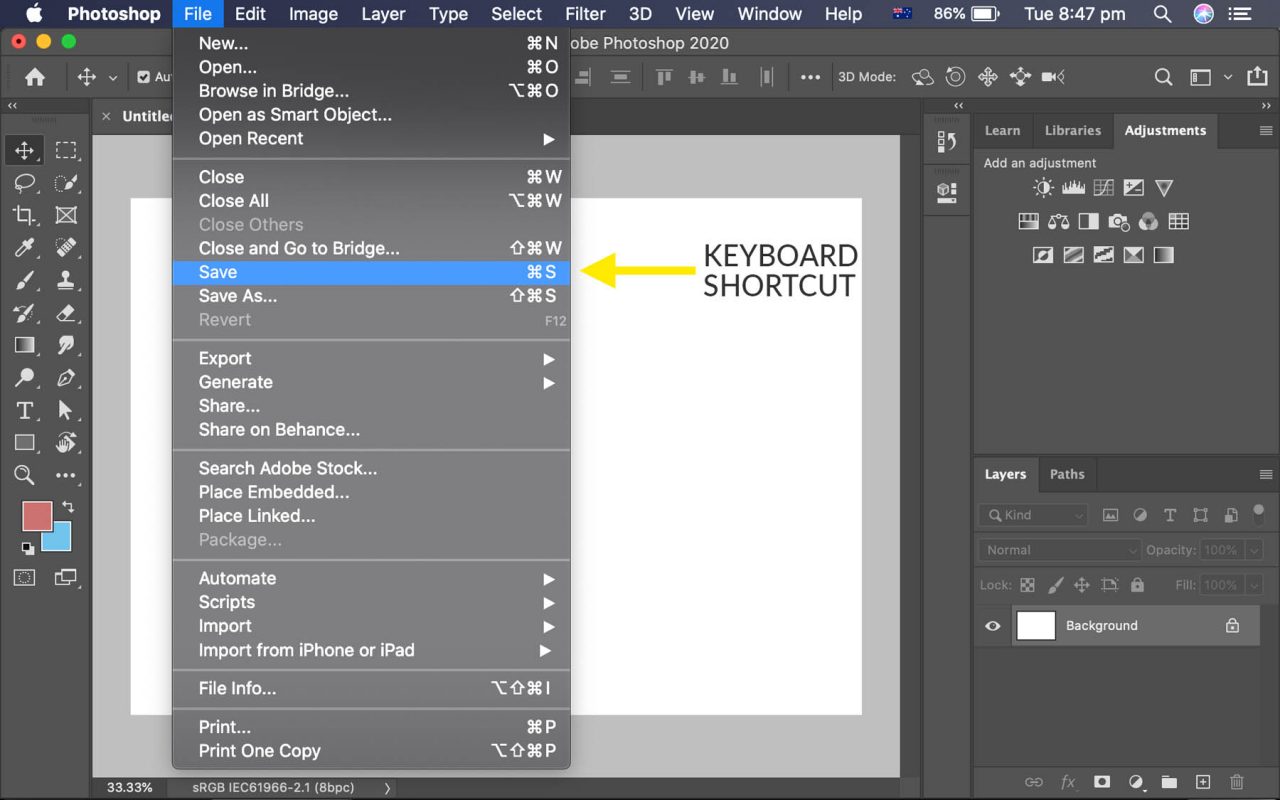
TIP: Make a point to write down and use the shortcuts for 3 commonly used menu items each week. Make a conscious effort to put them to use and reduce your time clicking through menu items.
PHOTOSHOP TOOLBAR
The toolbar is typically located on the left of the Photoshop workspace. You’ll see a number of icons representing a range of editing tools allowing you to make selections, paint, zoom, crop and so forth.
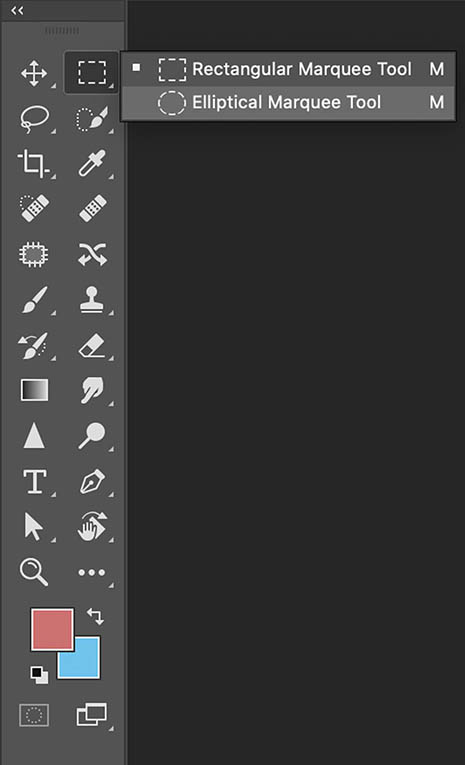
These tools have shortcut keys for easy access. Memorising shortcuts for your most commonly used tools will increase your editing efficiency.
TIP: Hover over a tool icon and its keyboard shortcut character will appear after a few seconds. Press the character on your keyboard to swap to that tool.
Some of these toolbar icons include a small triangle in the bottom right corner. This indicates that additional tools are grouped with this icon. Click and hold to see these other options appear in a fly-out menu.
Note, if you ever feel you’re not using the “right” version of a tool, as some have quite similar icons, click and hold to return to the top (default) tool.
TIP: If you know the keyboard shortcut character for a tool, you can hold Shift and click the shortcut character to scroll through all of the alternate options for that tool.
TRY IT:
With Photoshop open, hold the Shift key down and tap M once. The Marquee selection tool will become active. With Shift still depressed, tap M again. The shape of the Marquee tool will swap between rectangular and elliptical (oval) selection with each ‘M’ while Shift is held. Also try this with other toolbar shortcuts.

PHOTOSHOP OPTIONS BAR
As you click to select different tools from the left toolbar, note that the Options bar, located the top of the Photoshop workspace, changes contextually with the active tool. The bar presents you with variables which can be adjusted for each tool. For example, painting tools will display opacity and flow values; the Type tool with show character options; and so forth.

Try it and become familiar with the type of options you’re presented with for each tool, in this options bar. While you are editing, it’s important to be aware of these options, to know what’s available and where to control it. This is another location you should check if a tool isn’t giving you the expected result.
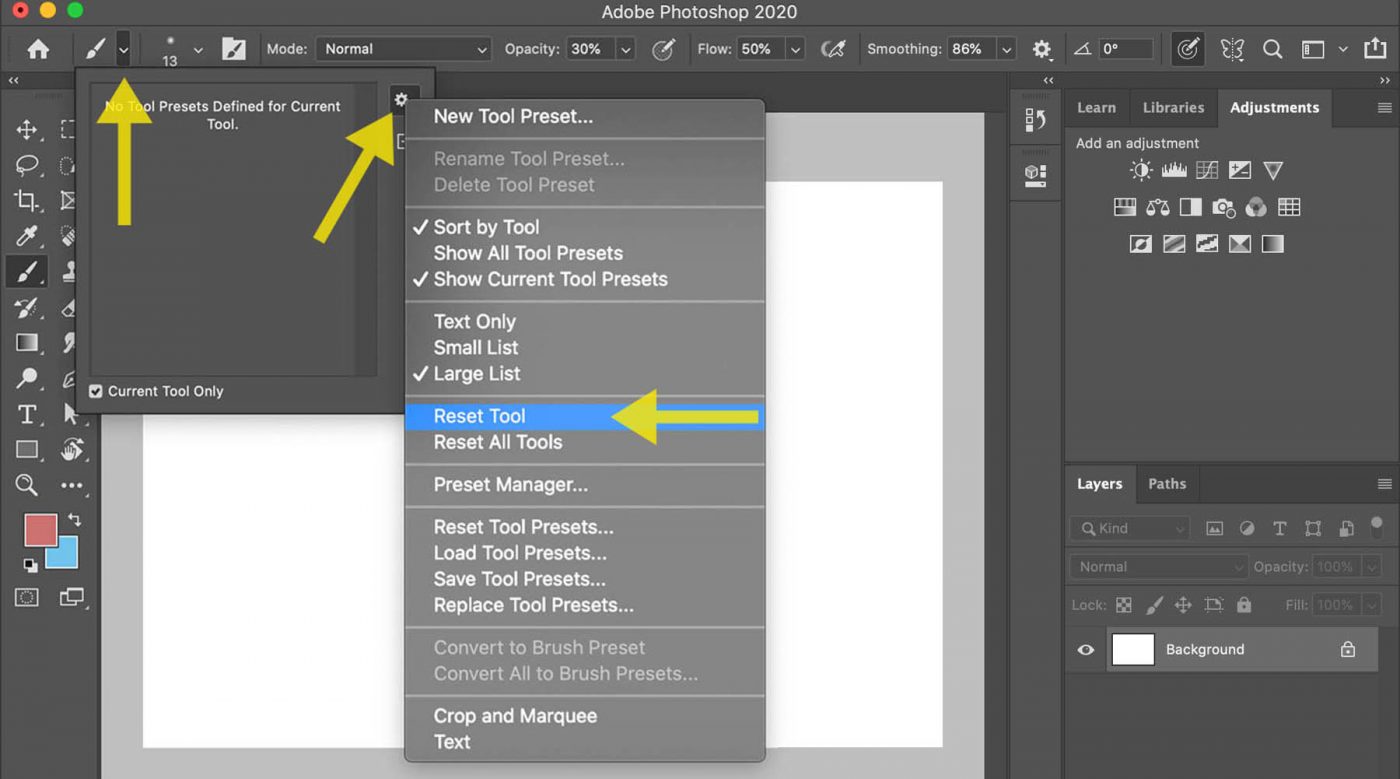
TIP: Don’t be afraid to experiment with the options for a tool. You can choose Reset Tool via the dropdown arrow next to the tool’s icon in the Options bar, to return to its default settings.
THE POWER OF THE PHOTOSHOP PANELS
Located on the right of your Photoshop workspace are a number of panels – sometimes referred to as palettes or windows. These panels allow you to control some of the most powerful features in Photoshop editing including Layers, Adjustments, Characters, Actions, History and more. If not currently shown, these panels can be made visible by selecting them from the Windows (top) menu. Untick them via the same method to hide them.
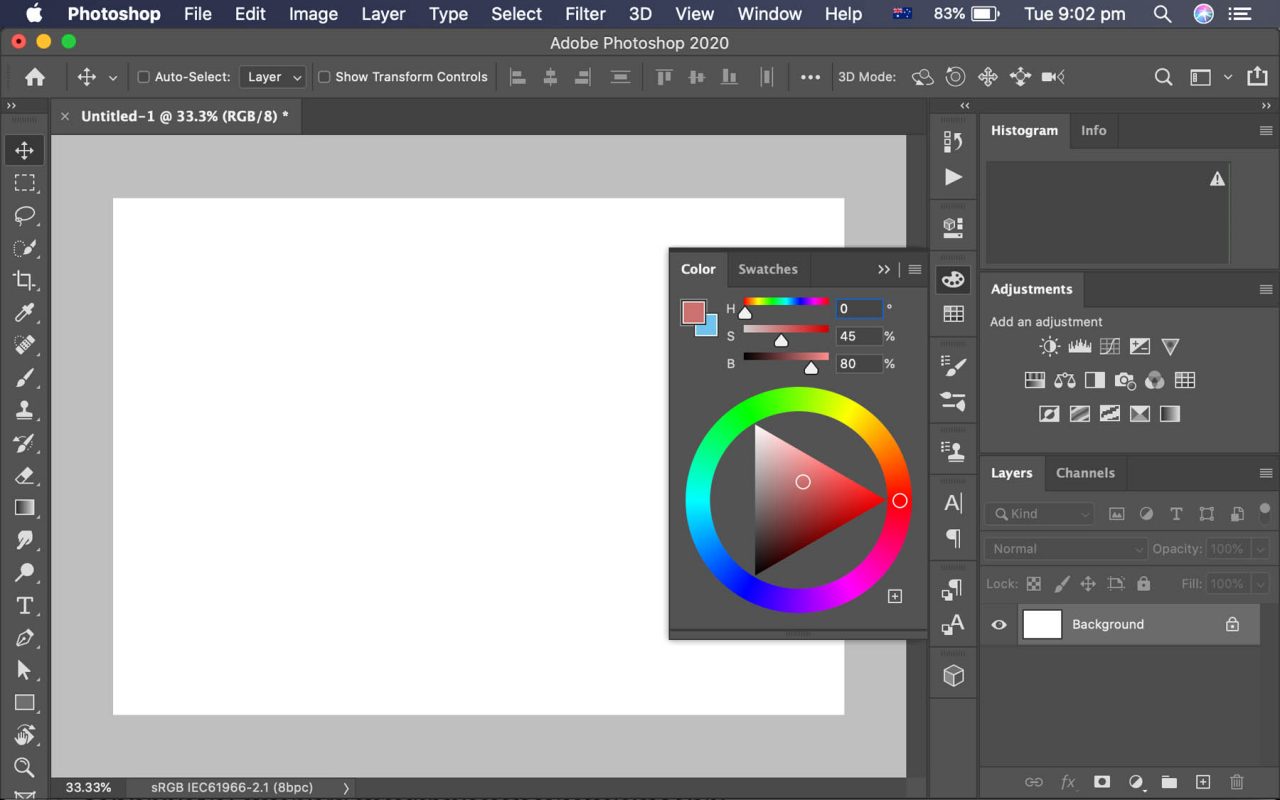
Photoshop offers many of these panels – more than you need in most editing sessions. Again, don’t let yourself become overwhelmed by the number of these panels. Instead, focus on becoming familiar with the ones you use most commonly.
TIPS FOR NAVIGATING PHOTOSHOP PANELS
Your panels may be arranged in one or more columns depending on your requirements.
COLLAPSE & EXPAND PANEL COLUMNS
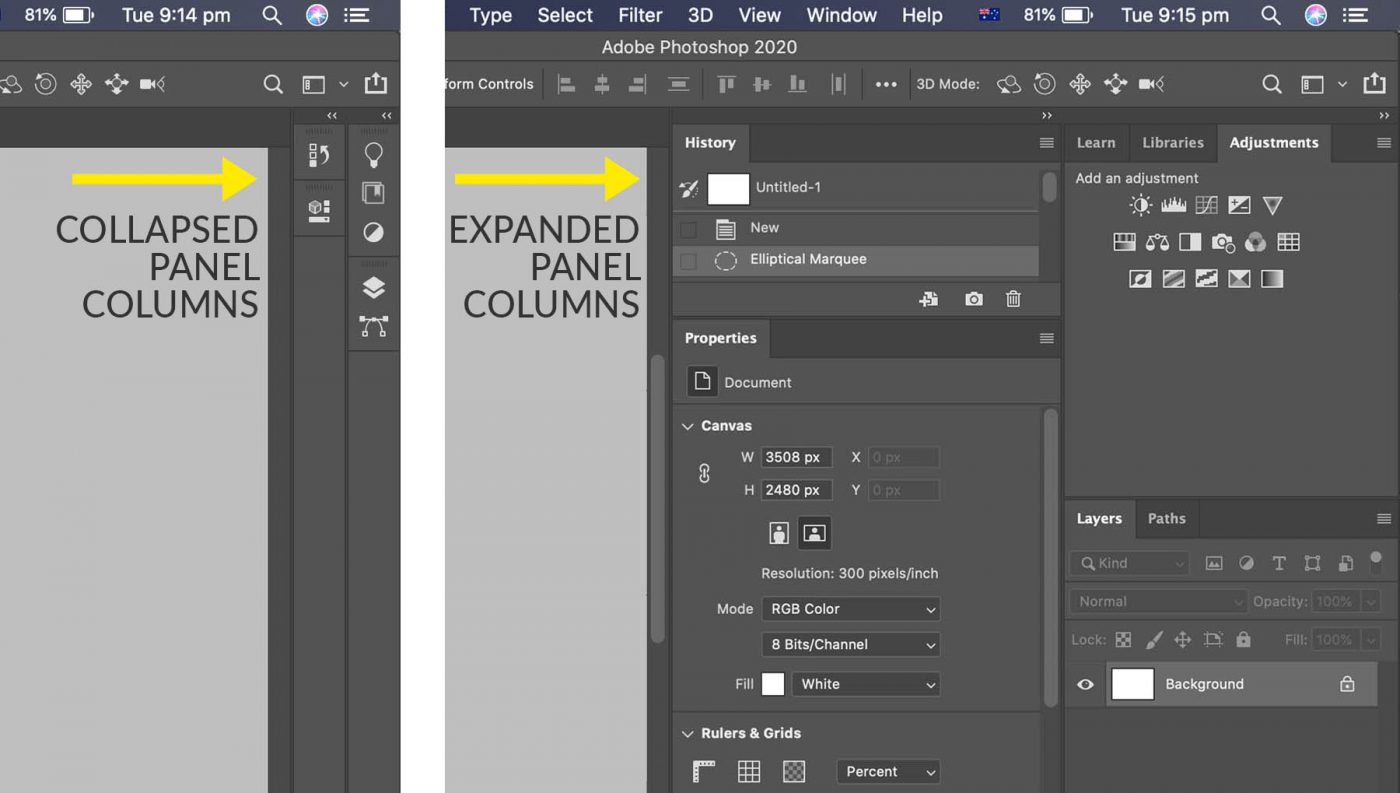
These columns of panels may be collapsed to show only their icons, or expanded to show full detail. This is a space-saving tip to help you work with minimal clutter in your Photoshop workspace. Click the double arrow icons >> to collapse or expand << each panel as required.
TIP: Organise your panels into 2 columns. Place those which you work with constantly in 1 column, and the other commonly used panels in the other. This will allow you to expand and collapse one set at a time, to maximise the view of your image.
TABS AND TAB GROUPS
Note each of these panels has a “tab”, much like a folder tab, displaying its name. To rearrange panels, click and drag the tab to move it to another location. Panels can be moved away from the sticky columns to free float. See the Swatches panel in the example below. They can also be moved to another location within the columns.
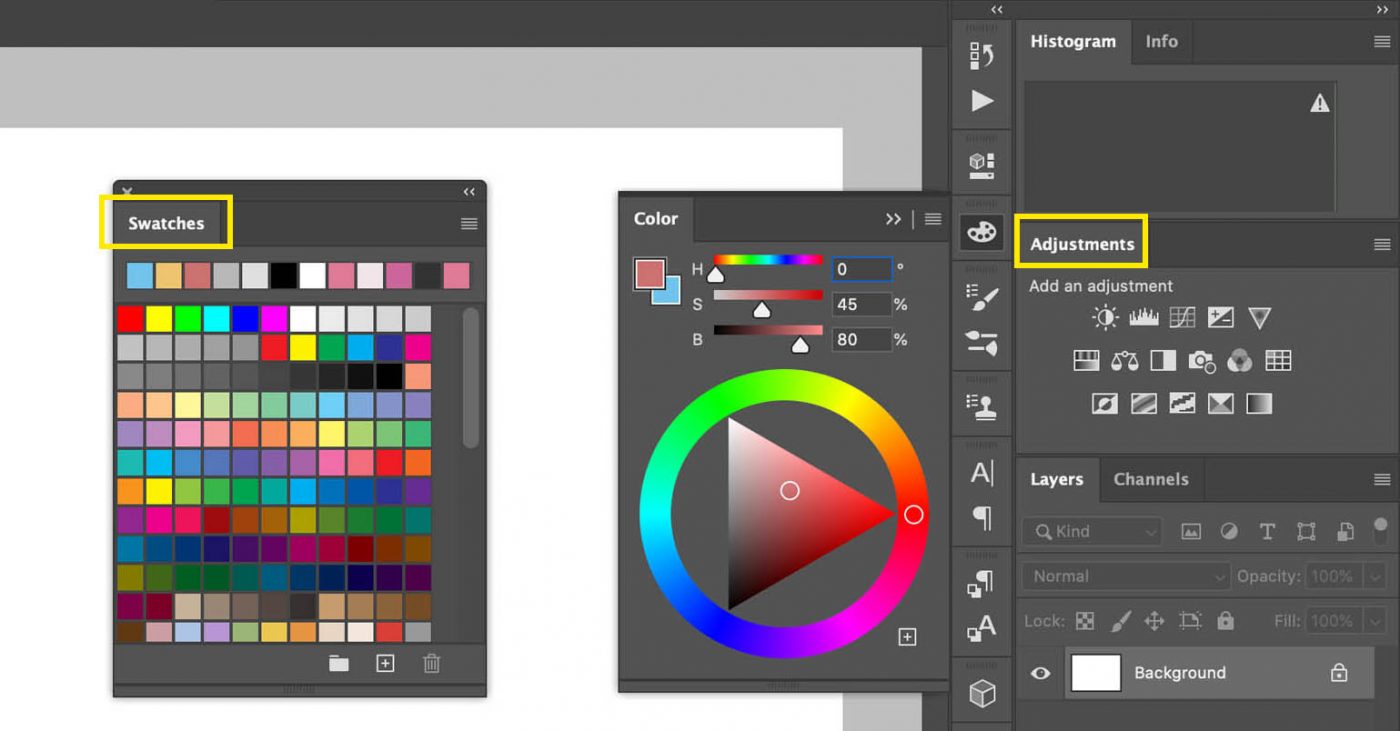
A “tab group” consists of multiple panels, ideally of similar tasks for ease of access. Layers and Channels are sitting in a tab group in the example above.
TIP: Drag and drop panels by their tabs to rearrange. Place panels which complement each other into groups. For example, Actions and History; Character and Paragraph, and so on.
PHOTOSHOP PANEL OPTIONS
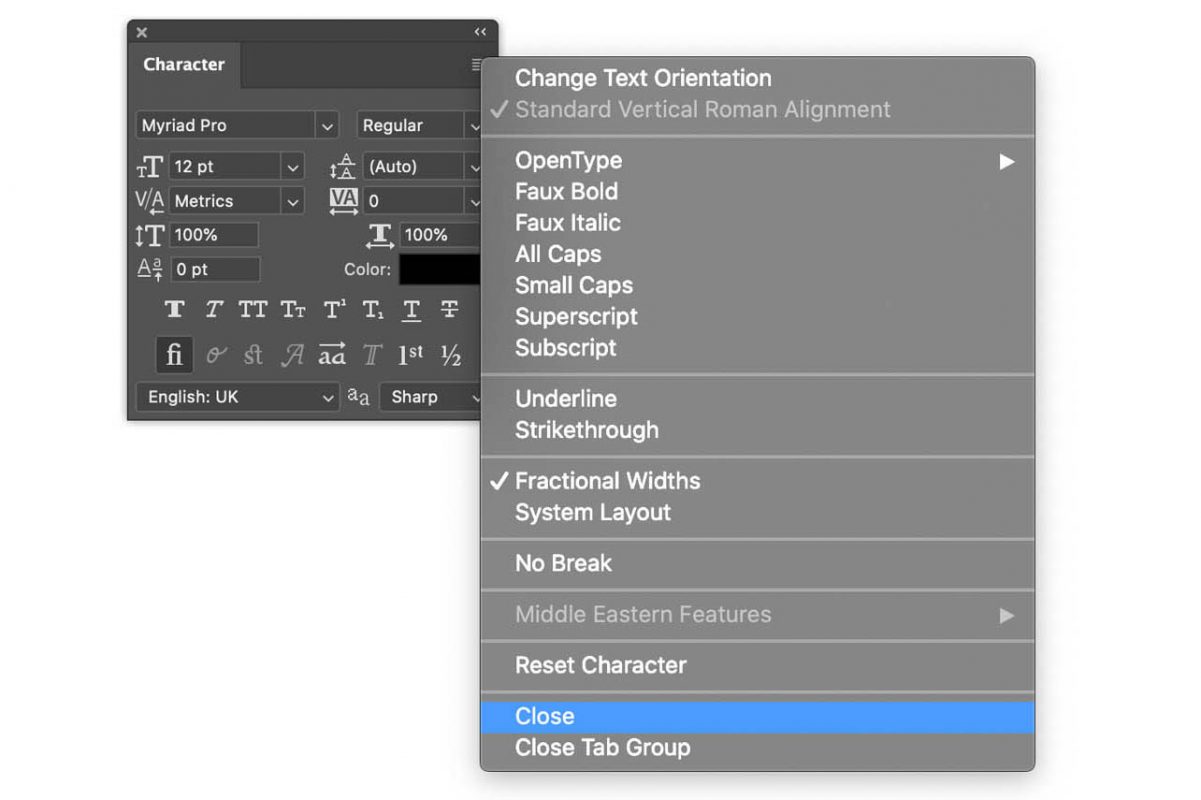
In the top right corner of each panel you’ll find a menu icon (3 horizontal lines also referred to as a hamburger menu). Click to reveal the panel options menu. The menu contains options specific to each panel. This fly-out menu is invaluable when you are working with certain panels such as Layers and Actions.
ACCESSING PREDEFINED PHOTOSHOP WORKSPACES
In time, you’ll come to know which of these panels you rely on regularly and can create your own preferred setups to display these. But if you’re not at that point yet, Adobe has created a range of common workspaces which you can access.
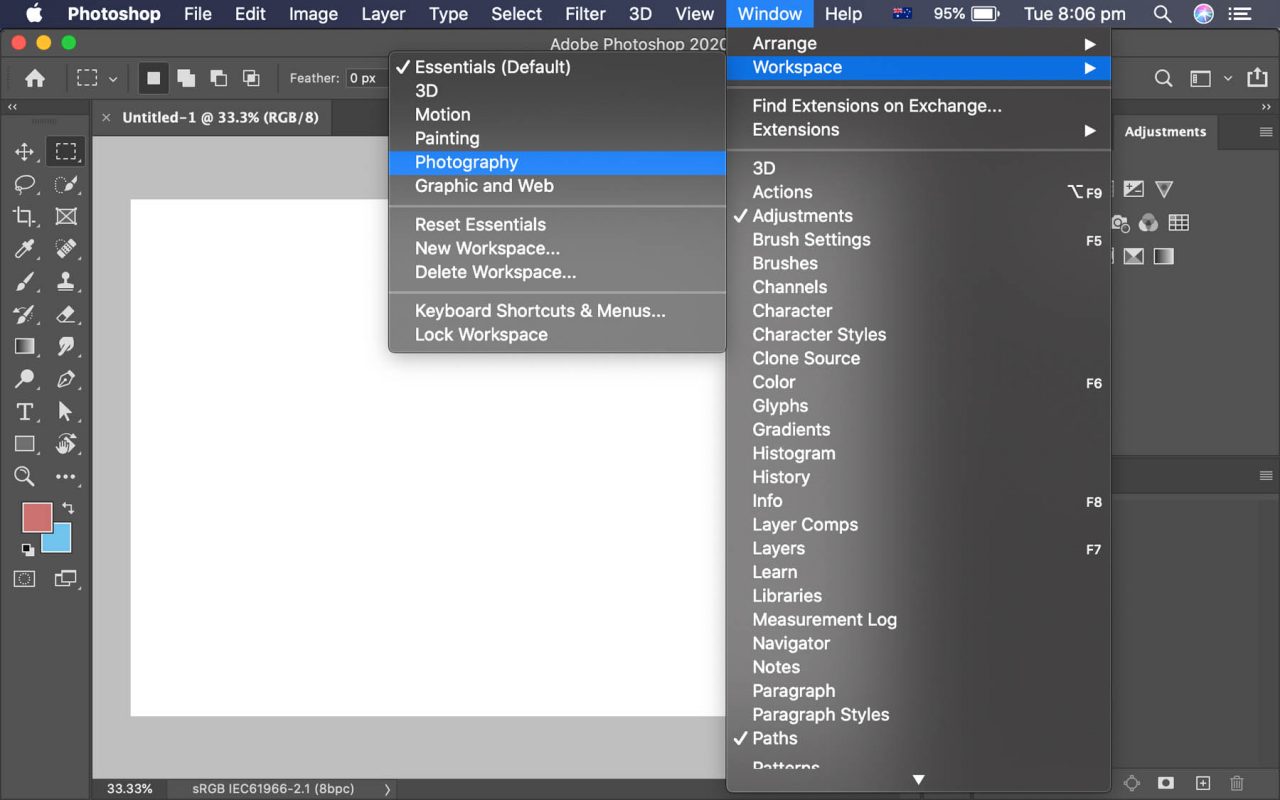
From the Window menu, choose Workspace, then one of the preset options. For photographers, we recommend Essentials or Photography. Your interface will rearrange to preset you with the most commonly used panels on the right, and tools in your left toolbar, best suited to the theme you select, and all neatly arranged.
TIP: Arrange your workspace into the layout you like to work with, then save your own customised workspace via Window > Workspace > New Workspace.

Bookmark this article and/or share it with your colleagues who might also benefit from this information.
We believe the best way to learn Photoshop is by playing. Consume this article in bite-sized chunks. If you’ve not already done so, open Photoshop and try the tips we’ve listed to make yourself familiar with faster ways of working.
If you want to take things further, we’ve found this article with easy steps for changing colours in Photoshop.
LEARN PHOTOSHOP WITH KELLY BROWN
For more help learning to master Photoshop editing, see Kelly Brown’s range of editing tutorials in the NewbornPosing.com store.

